


How to Connect your PC to your UiPath Automation Cloud account
There are three main tools you use when automating robotic processes using UiPath RPA (robotic process automation) technology – UiPath Studio, UiPath Robot, and UiPath Orchestrator; the first two are desktop applications while the third is web-based. Now UiPath, the global leader in RPA technology, offers two main classes of license for users to choose from – Community and Enterprise; the former is free while the latter which has a couple of flavors is a paid offer.
UiPath offers the Community edition free so that developers and small teams can begin their automation journey. As such, the Community package allows you to have access to both UiPath Studio and UiPath Robot which are installed on your PC, but your access to UiPath Orchestrator has to be via your cloud/platform account.
The purpose of this tutorial, therefore, is to help you get through the steps you need to take to get the service functionality of the UiPath Robot application (installed on your PC when you install any version of the UiPath Studio application) to be able to communicate with the Robots you have existing on (or added to) any UiPath Orchestrator instance connected with your account on the UiPath cloud platform.
In addition, if you are yet to install Studio on your PC, we shall walk you through that as well. Shall we begin?
Step 1
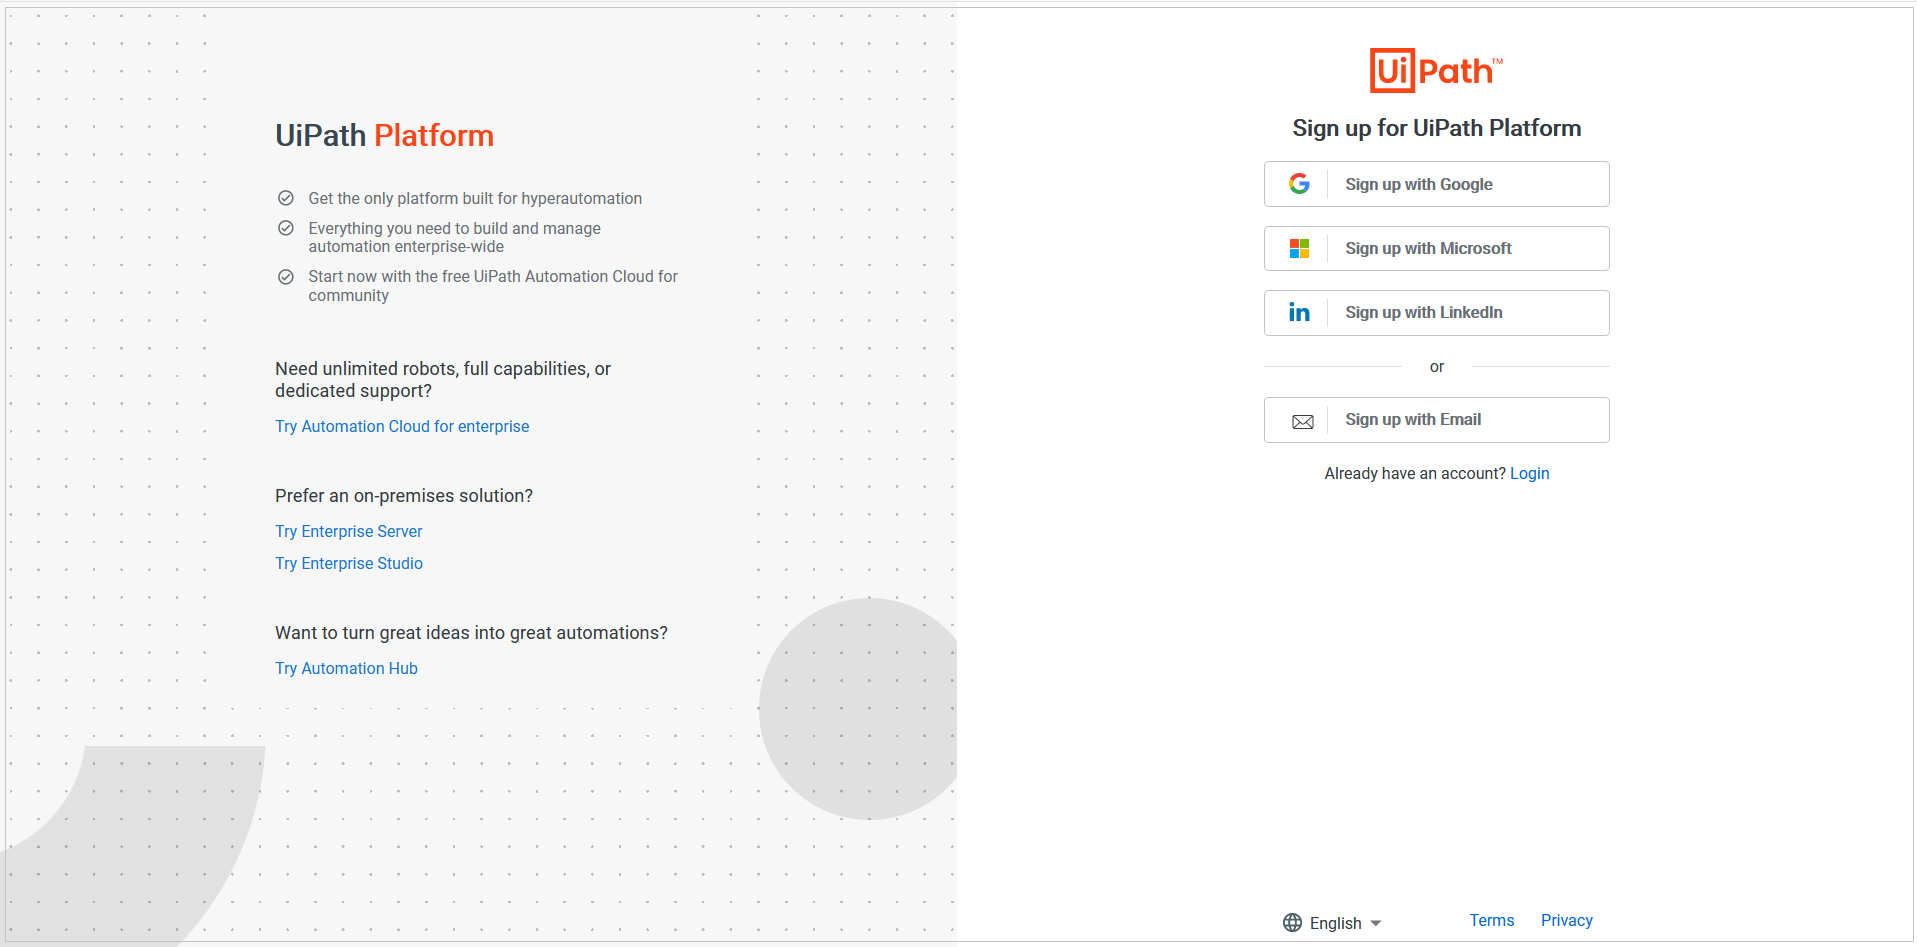
Open the UiPath Platform Trial page (i.e. www.uipath.com/platform-trial) in your browser (preferably Google Chrome or Mozilla Firefox). You shall be routed to the page depicted by the image below.
Step 2
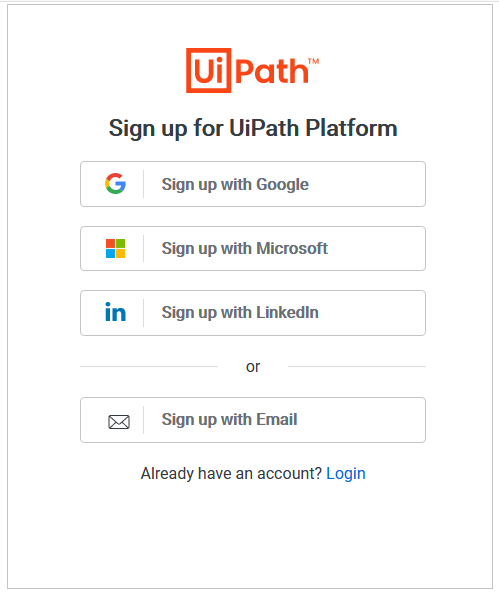
Sign up for UiPath Platform.
We do this so as to register for Community Licensed account; such an account is ALWAYS free and if you so choose, you can upgrade it to the Enterprise edition (which is paid) at any time.
Step 3
Choose an Account Registration option.
There are four (4) options to choose from. If you already have a Gmail account, it is advisable you take the “Sign up with Google” option. The same applies if you have a Microsoft or LinkedIn account. For the purpose of this guide, we shall be taking the last alternative, which is “Sign up with Email”.

Step 4
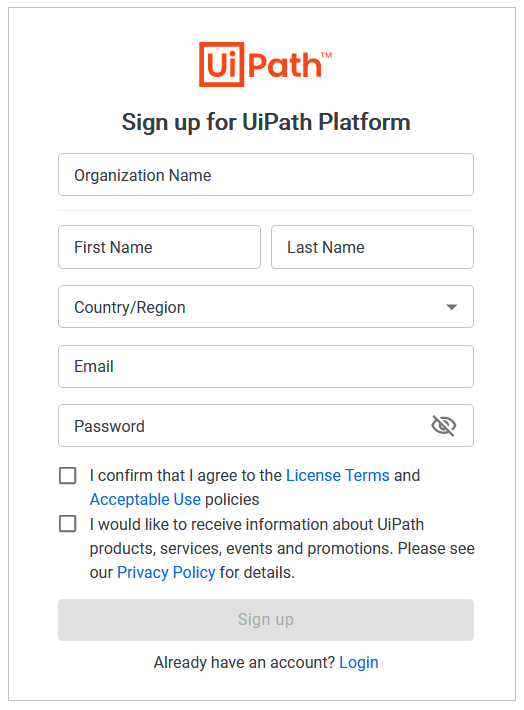
Create your account on the UiPath cloud platform.
Fill the registration form. Fill in the fields on the form, but note that your password should have a least 8 characters which MUST include at least one each of an uppercase letter, a lowercase character, a number, and a special character. Next is to check the “I confirm that I agree to the License Terms and Acceptable Use policies” checkbox. Then click on the Signup button.
Step 5
Email verification.
Those who choose to register using their Google, Microsoft or LinkedIn account will not use this step. So if like me, you decided to register using the “Sign up with Email” then you should see the screen depicted by the image below.
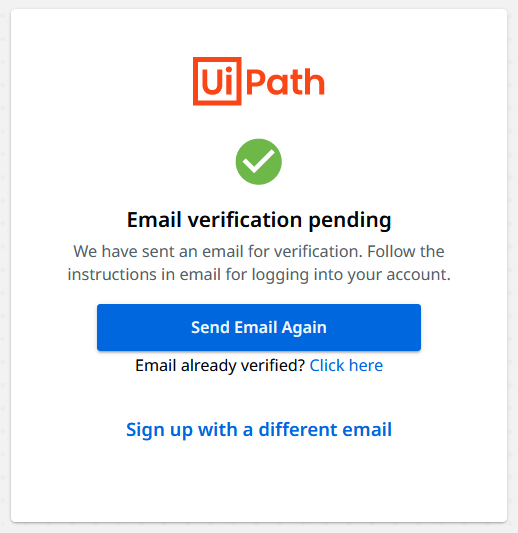
The implication is that you need to check the Inbox or Spam/Junk folder of the email you used for the registration. You should see an email titled “Verify your email” from “UiPath Platform” or something. Open the mail and then click on the “Verify Email” button (see Image below).

Step 6
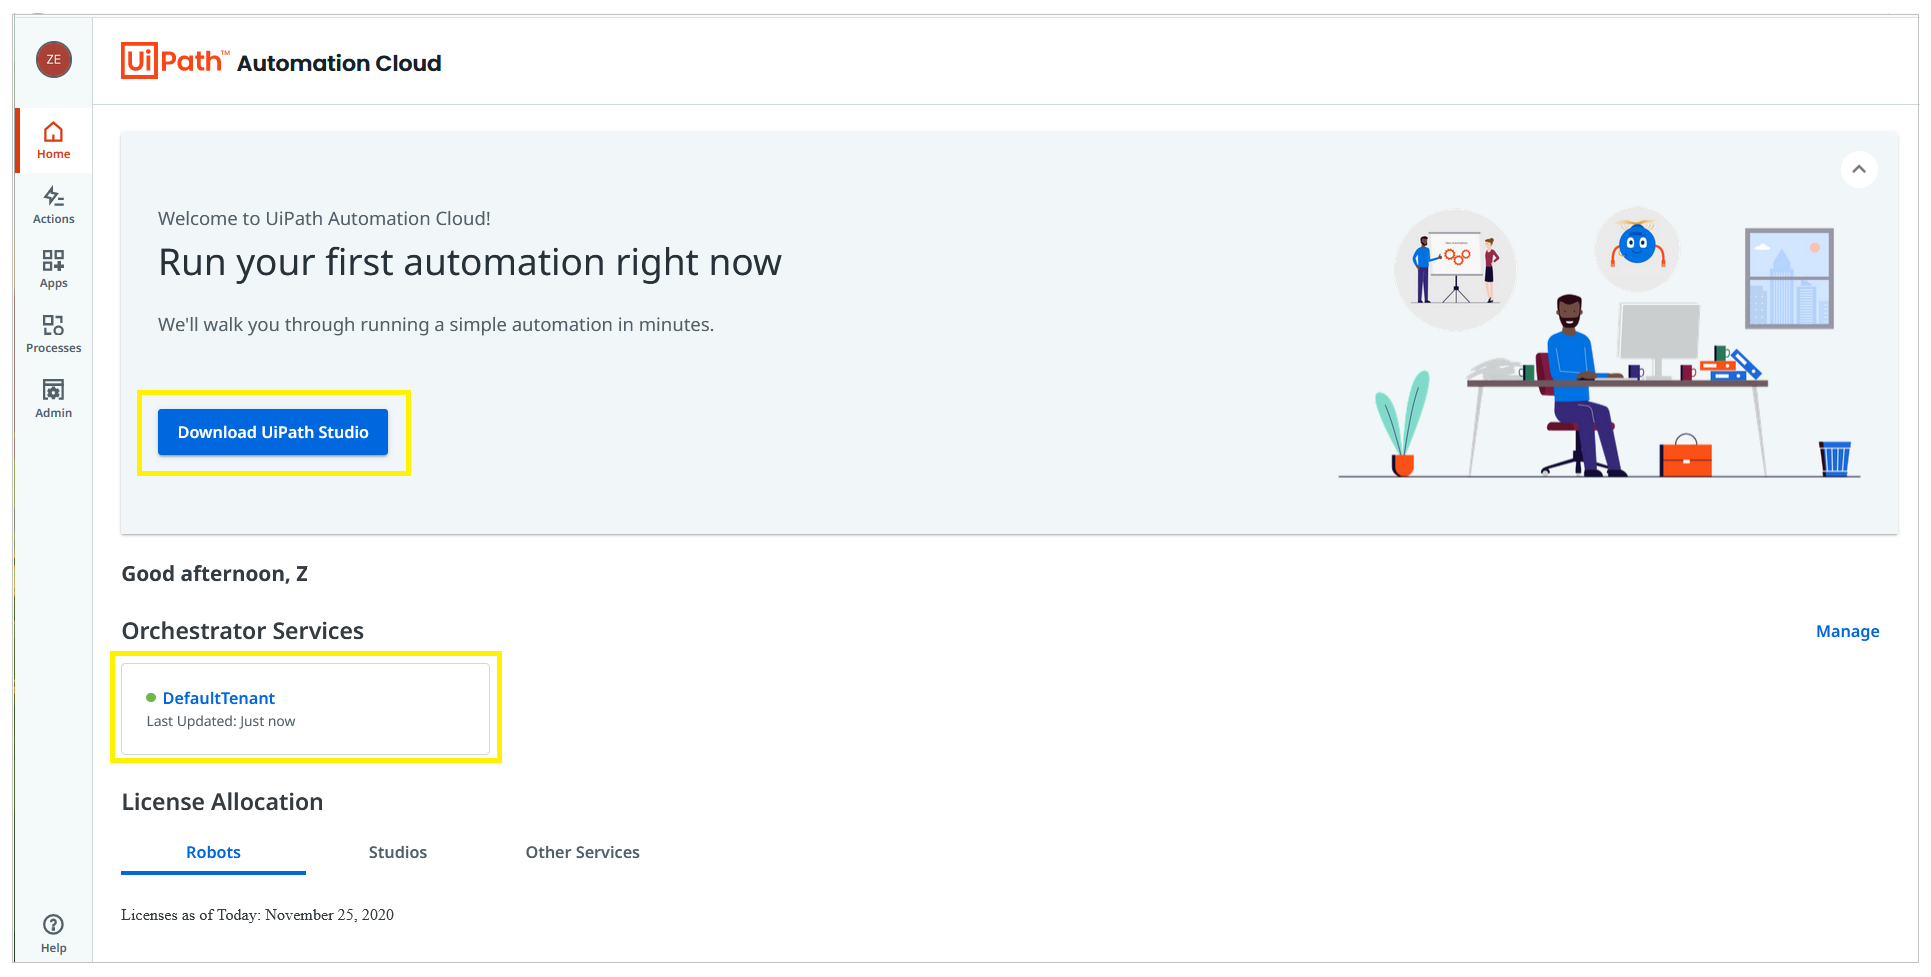
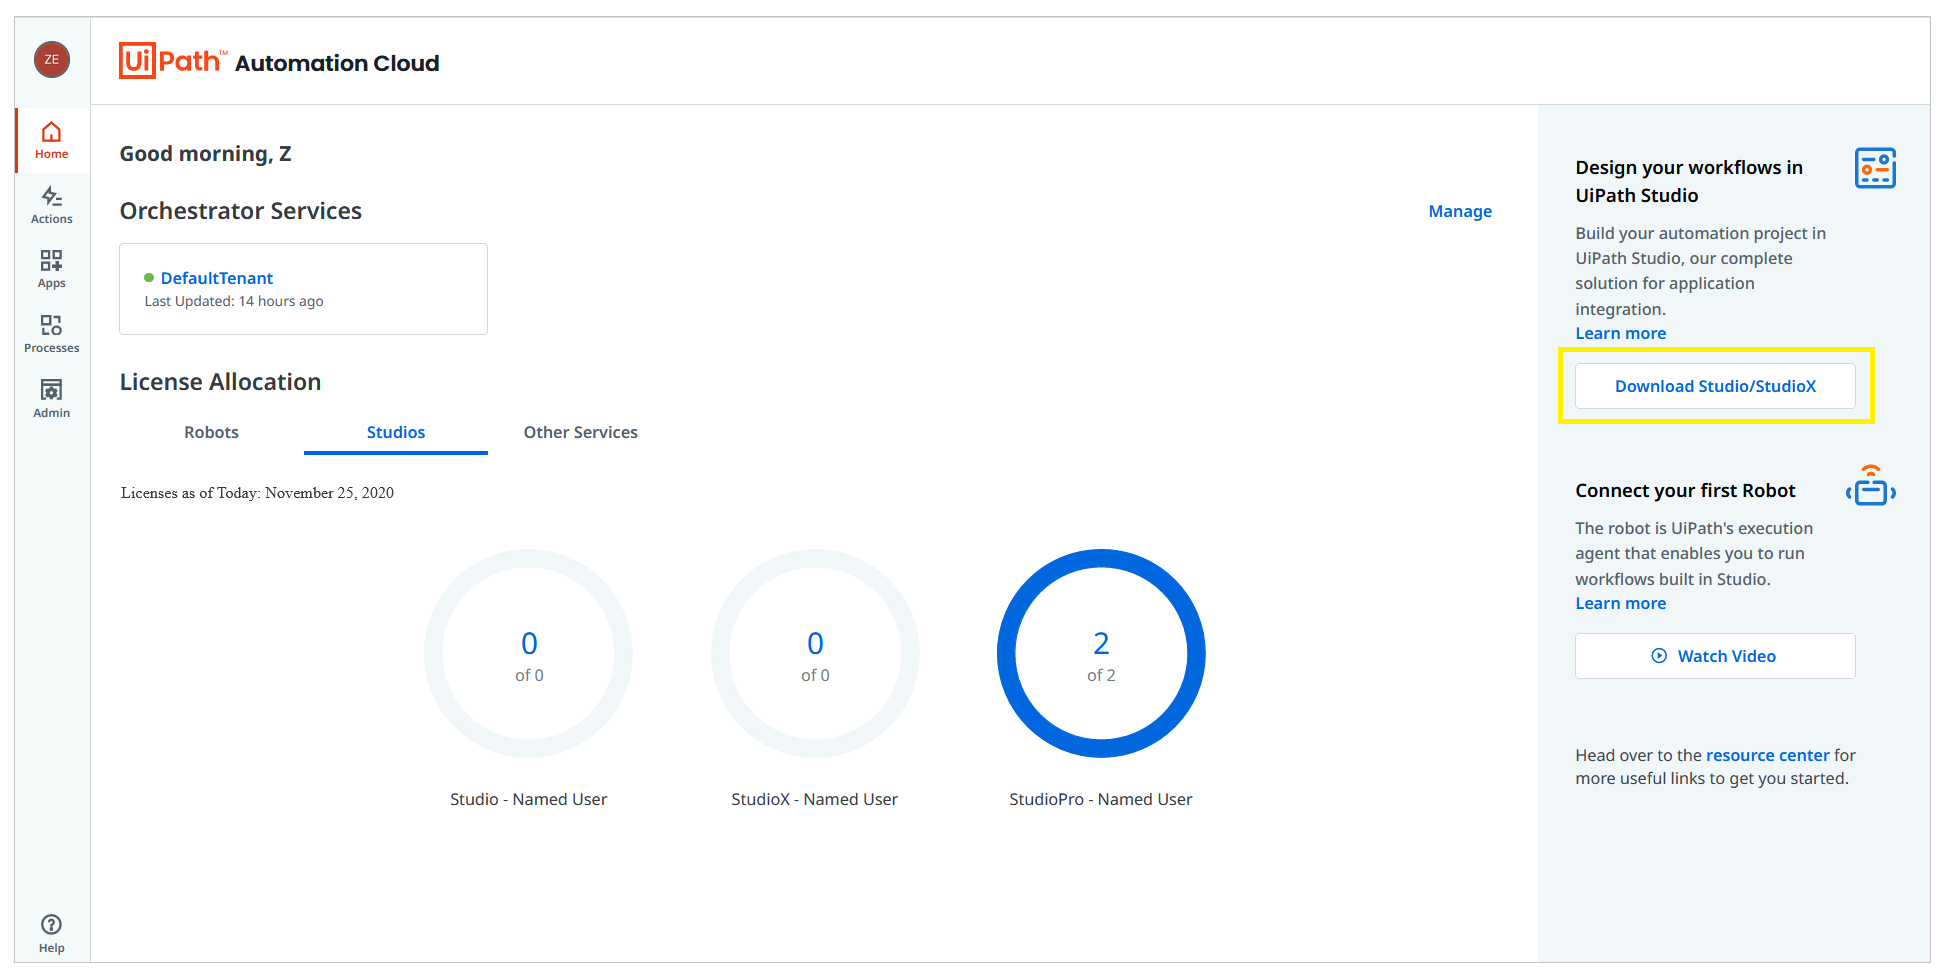
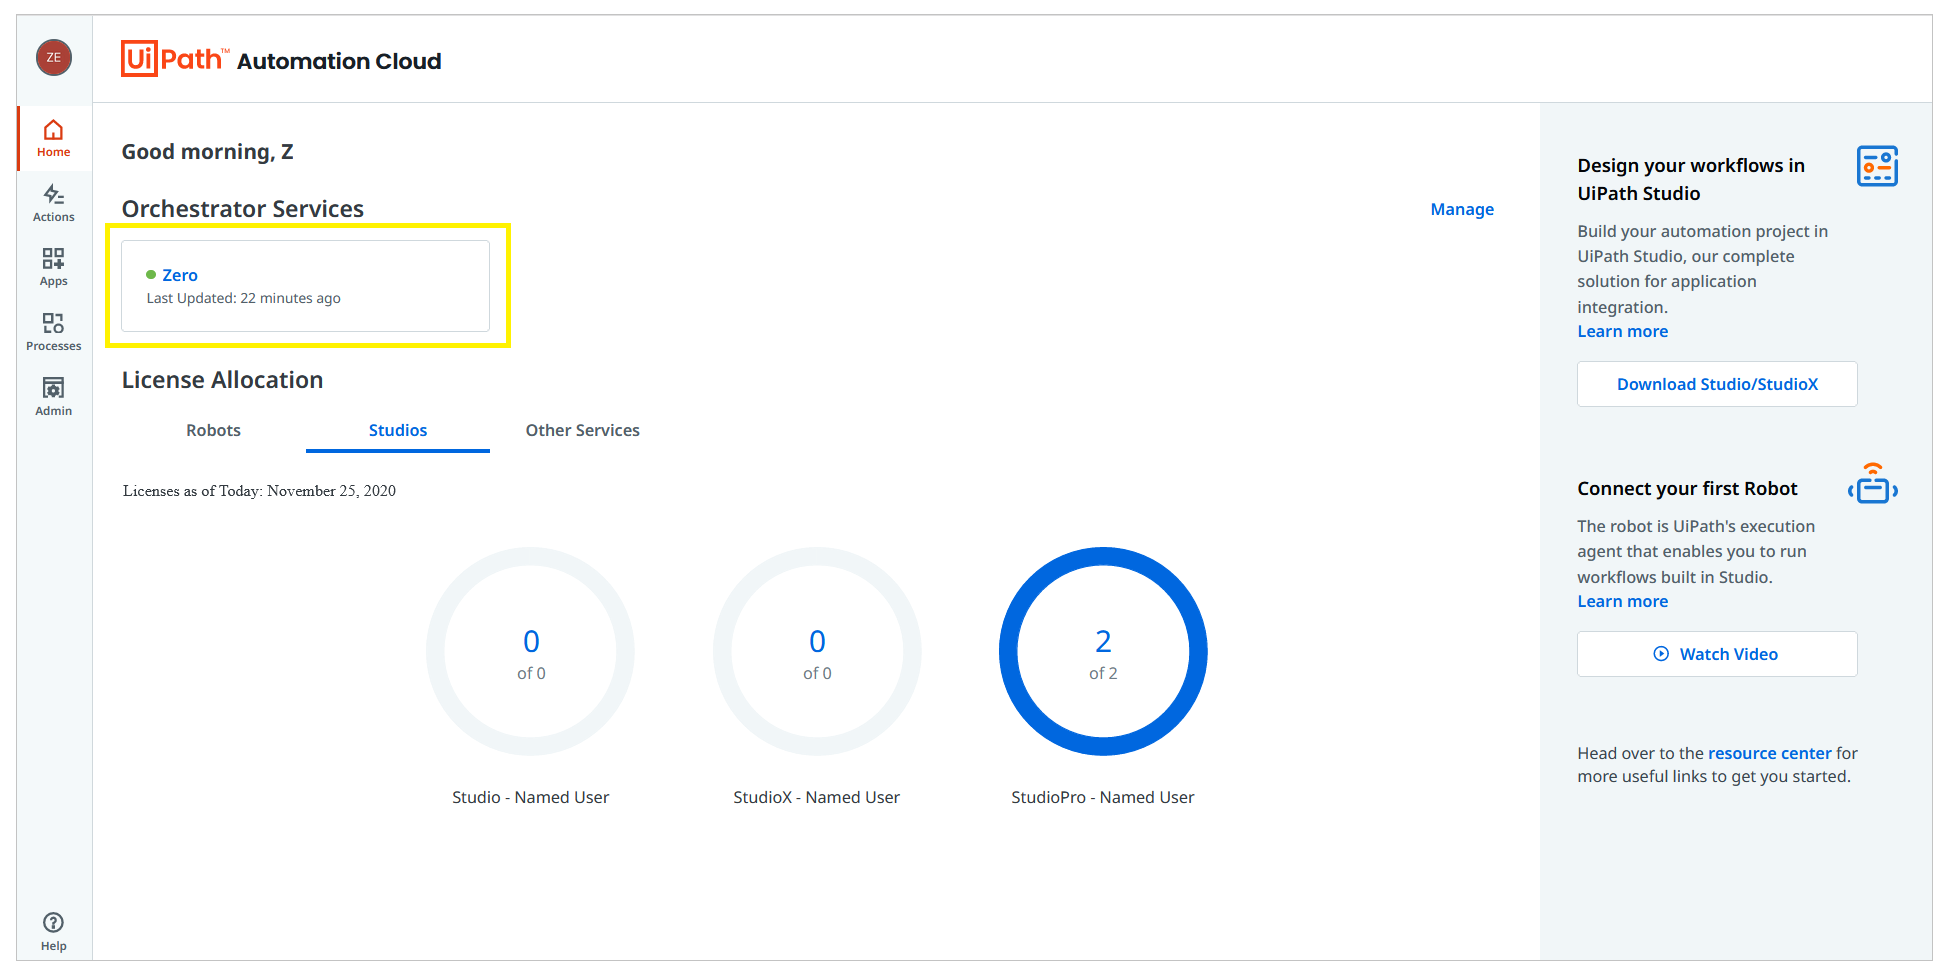
A new browser opens and you should be routed to the home page of your new Automation Cloud account (see the image below). Some things you can take note of on this particular screen:
- You can download the UiPath Studio installer from the banner at the top of the page (more on this later).
- An Orchestrator Service is created, for instance, the one on the image below says DefaultTenant. If yours has a different name, there is nothing to worry about since you can always change the name to what you want. The Community License allows only one orchestrator service per cloud account.
- Each Automation Cloud account has certain licenses allocated to it with regards to robots, studios, and other services. The Community License affords us 2 attended robots, 1 unattended-runtime robot, and 1 testing-runtime robot.
Step 7
Collapse the “Run your first automation right now” banner, and then close it.
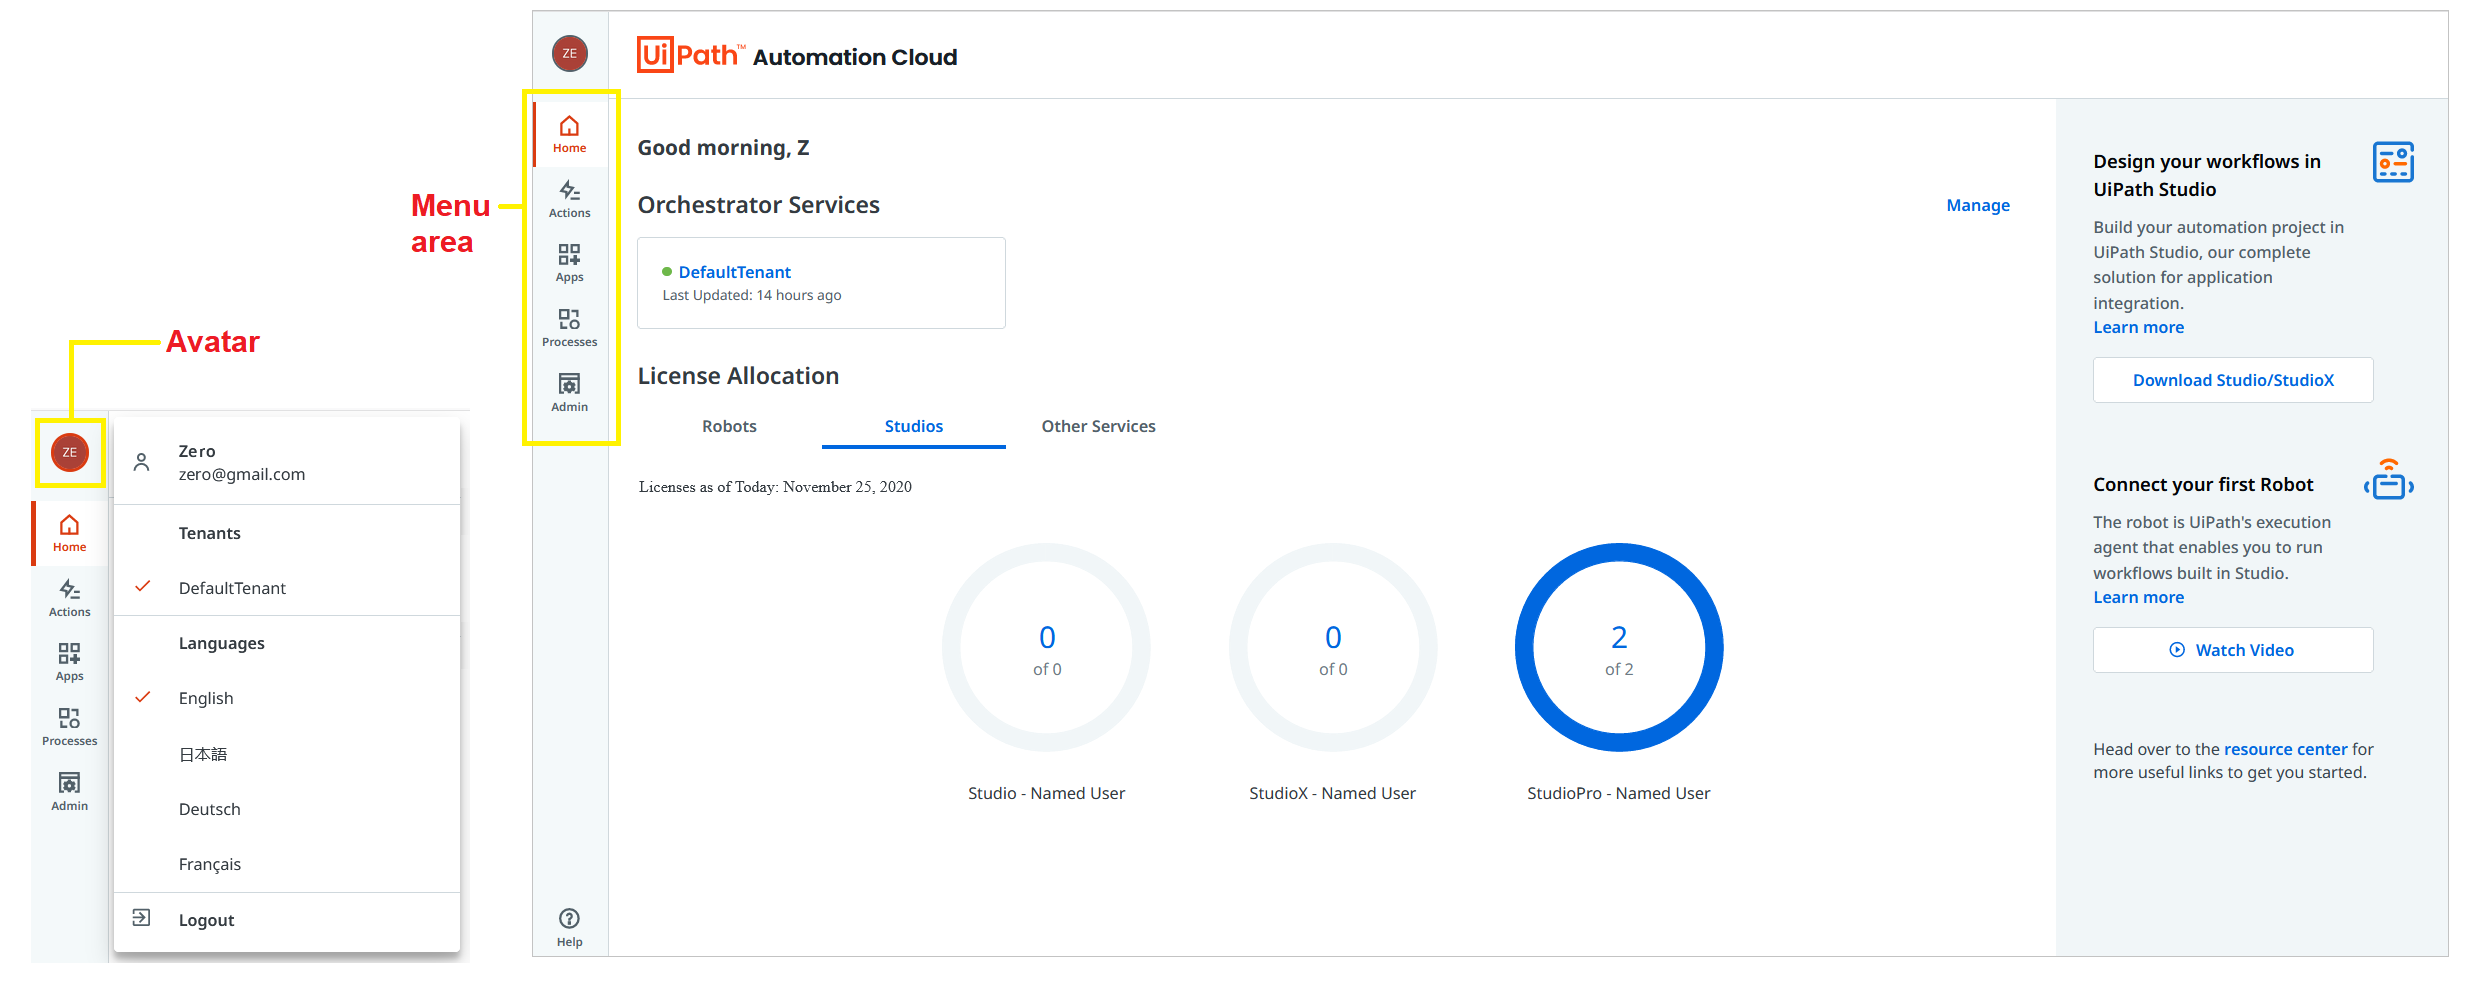
Take a careful look at the browser window before you. You should see the Avatar and Menu area on the left pane of your screen.
Also, notice the numbers in the ‘License Allocation’ area of your dashboard? The community edition of UiPath gives you access to robot and studio licenses: Four machines for Production purposes i.e. 2 attended (named user), 1 unattended (runtime), and 1 testing (runtime); as well as Two machines for Development purposes i.e. 2 StudioPro (named user). I shall talk about this just before the end of this tutorial post.
Step 8
Most often than not, when creating your Automation Cloud account, the tenant (Orchestrator Service) created is patterned with respect to either the company/organization name or your first name you inputted when registering your account. In this step, I shall be changing the name of my Orchestrator Service from DefaultTenant to a name I prefer, say, Zero. If you are not interested in doing this, kindly move on to Step 9.
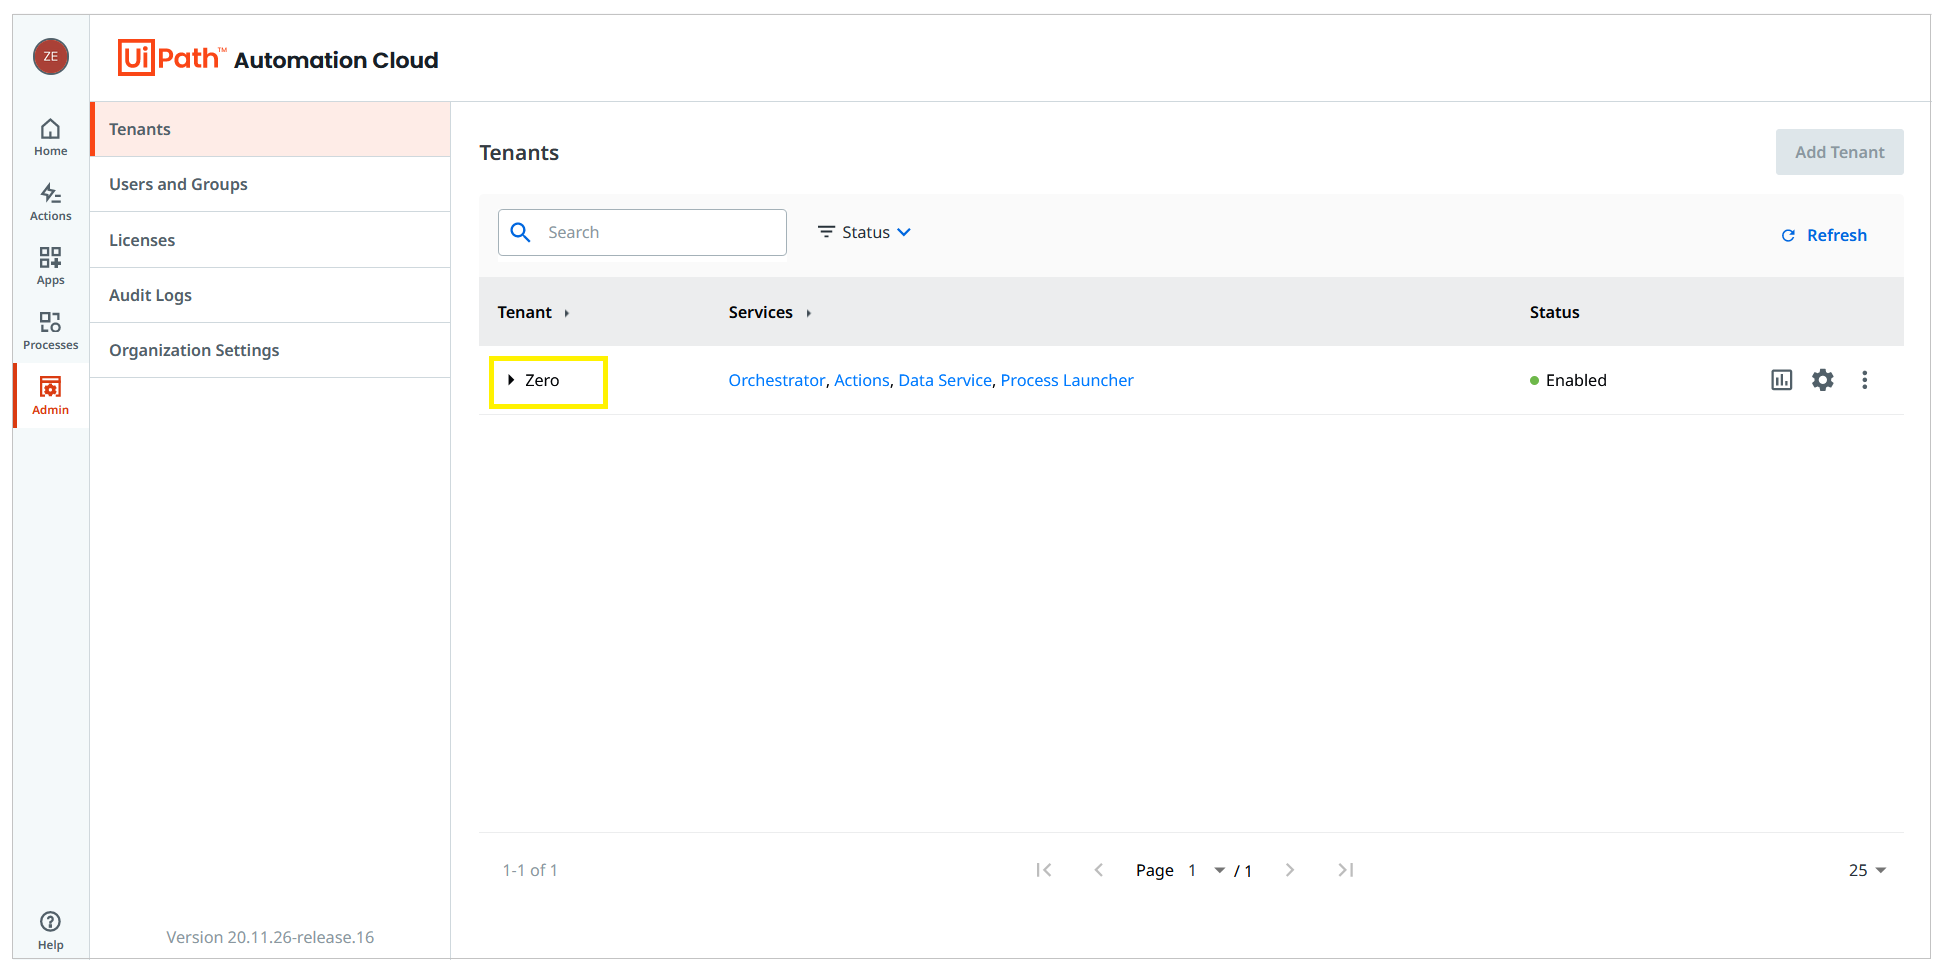
Click on the Admin menu option in the Menu area to open the Admin page (see the image below).
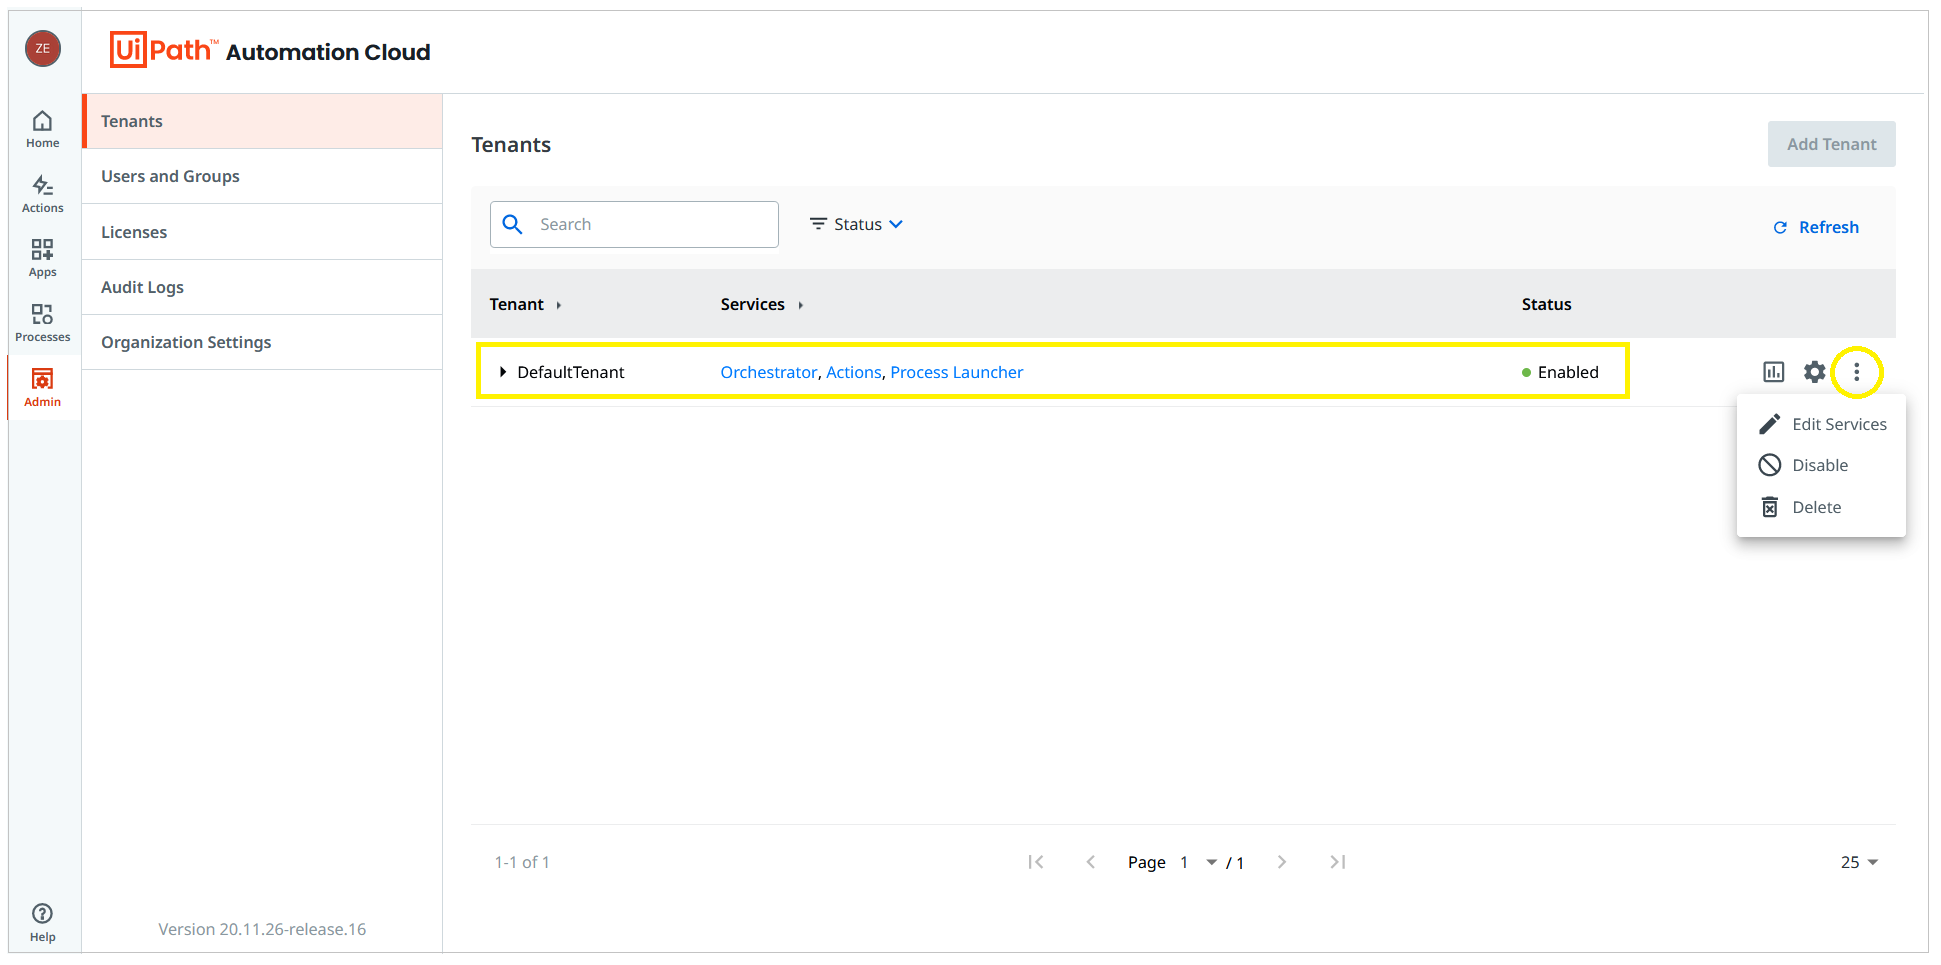
All tenants (Orchestrator Service instances) tied to your account are listed in the Tenants section of the Admin page of your account. Since you are using a community license, you should see only one tenant listed, with its status as “enabled.”
There is a couple of action buttons on the far right of the row, the last of which is an ellipsis (consult the image above); clicking on it pops up a dropdown menu containing other action buttons. It is the ‘Edit Services‘ action we are interested in. Clicking on the Edit Services button allows me to add/remove services to/from the indicated tenant, as well as modify the name of the tenant (see the image below).
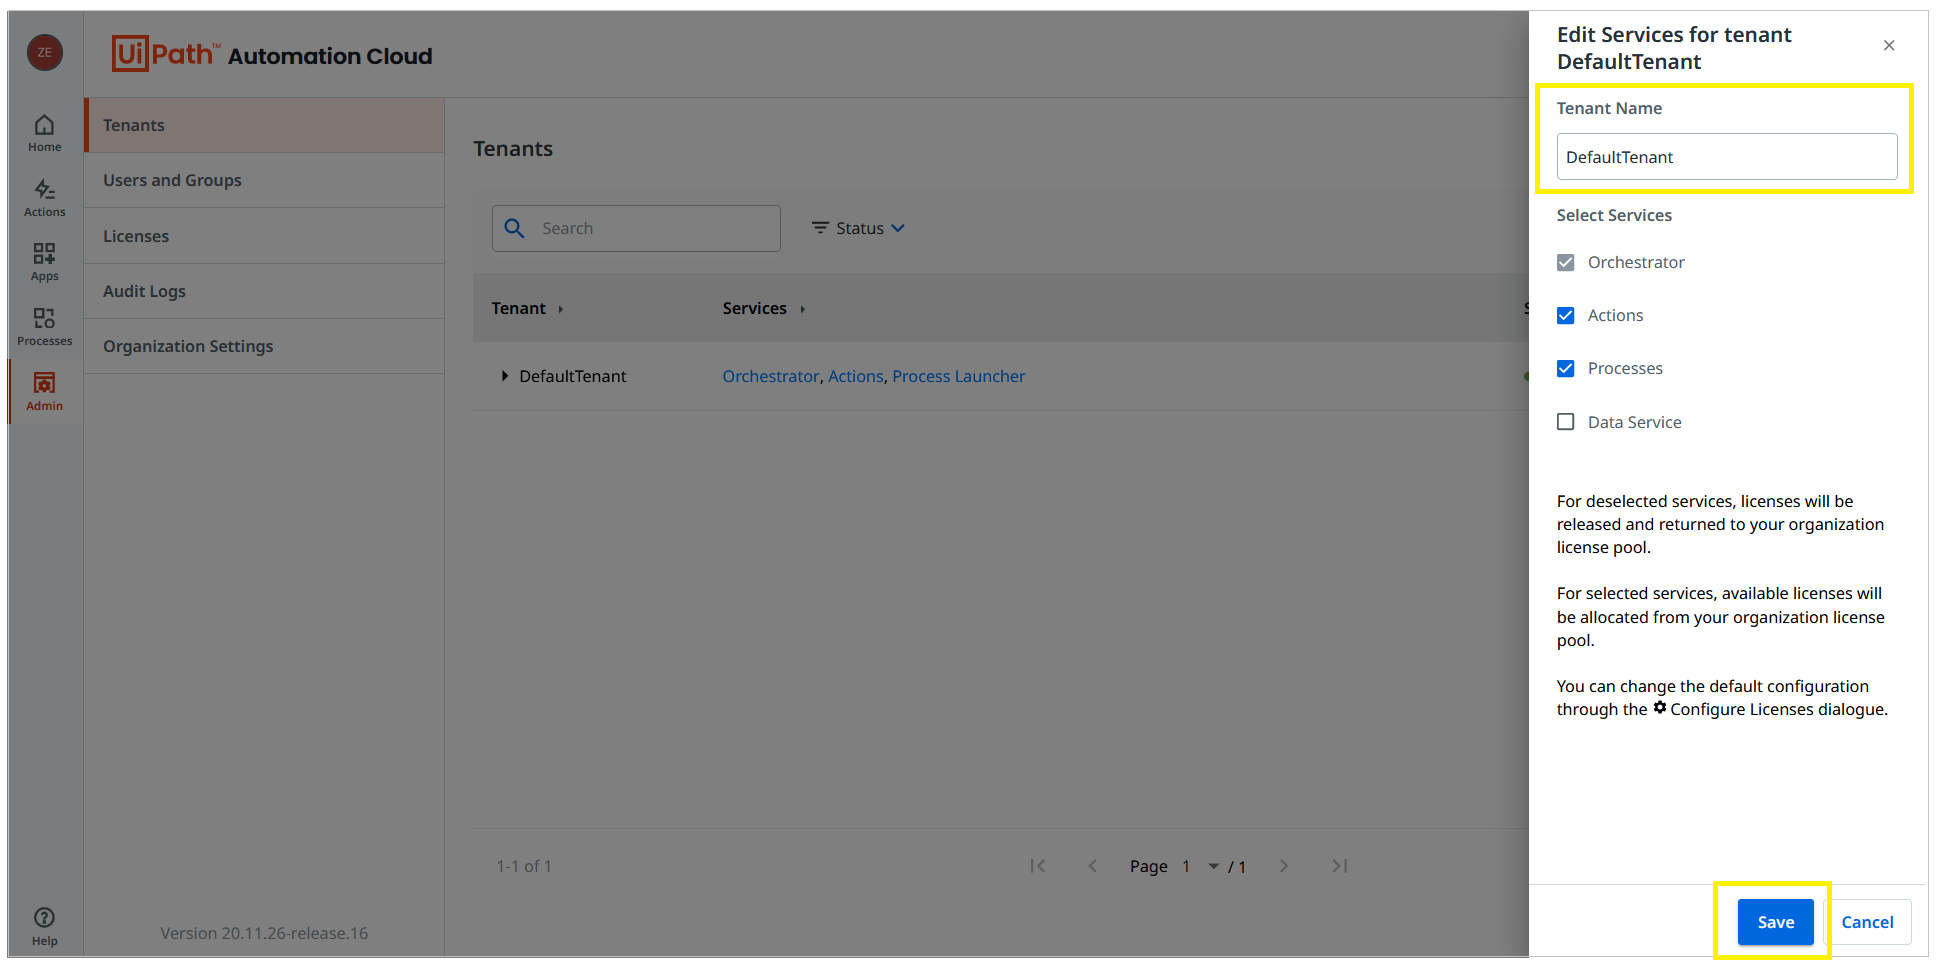
After making the desired changes, click on the Save button. A dialog pops up with a ‘Change Service Name‘ warning. Click on the Proceed button (see the image below).
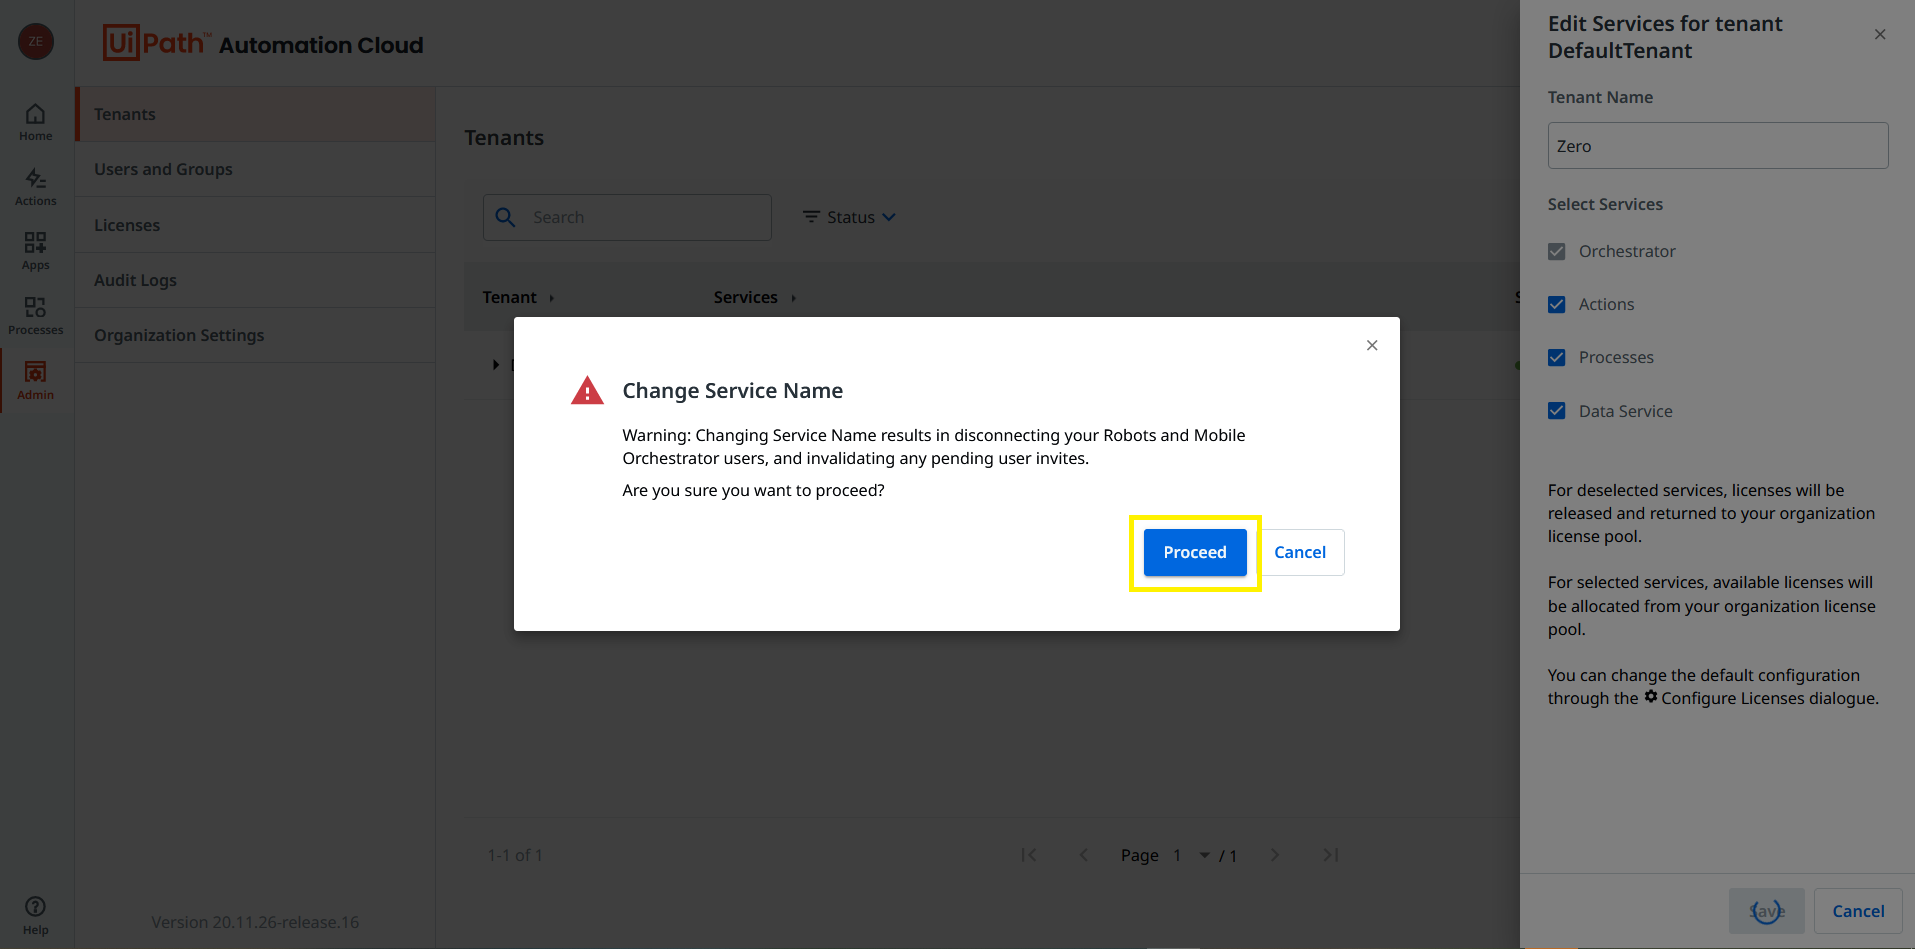
Please note that if you change the name of a tenant, you will have to reconnect all the Robot users (or machines) connected to the tenant. This is because the tenant name is a part of the orchestrator URL of the tenant. More on this later on.
Before we proceed to the next step, confirm that your tenant now reflects the new name.
Step 9
Download the UiPath Studio installer.
If you have already downloaded the UiPath Studio installer, kindly skip to Step 10; and if you already have UiPath Studio installed on your PC, please skip to Step 11; else click on Home in the Menu area, look for the Download Studio/StudioX button (refer to the image below) on the side-bar on the right of the screen, and click on it to download the installer.
Step 10
When the installer is done downloading, locate it, then right-click on it and from the context menu that pops up, select “Run as administrator”. If User Account Control on your Windows machine prompts you with “Do you want to allow this app to make changes to your device?” message, click on the ‘Yes’ button. Wait a bit for the installation process to complete.
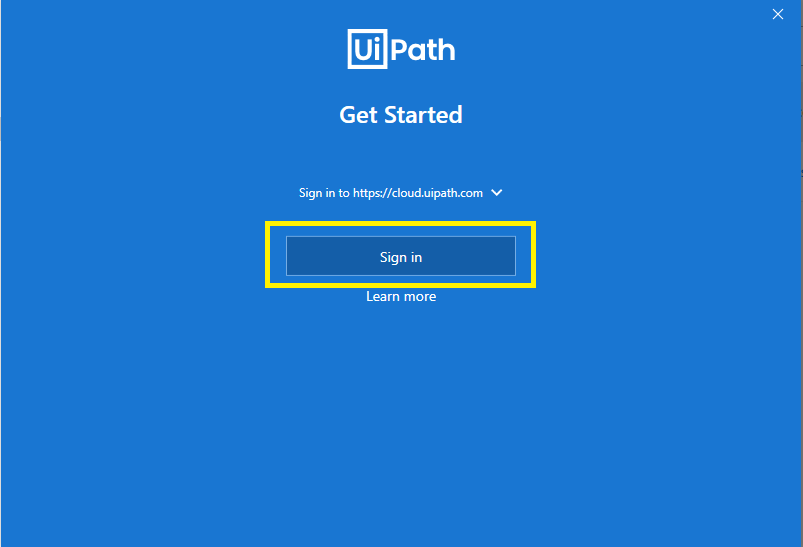
When you see the screen depicted in the above image, it implies you have to log into cloud.uipath.com (you may want to bookmark it for future use). Click on the “Sign in” button. If a list of browsers is displayed, select one (preferably Chrome or Edge, and then click on the OK button.
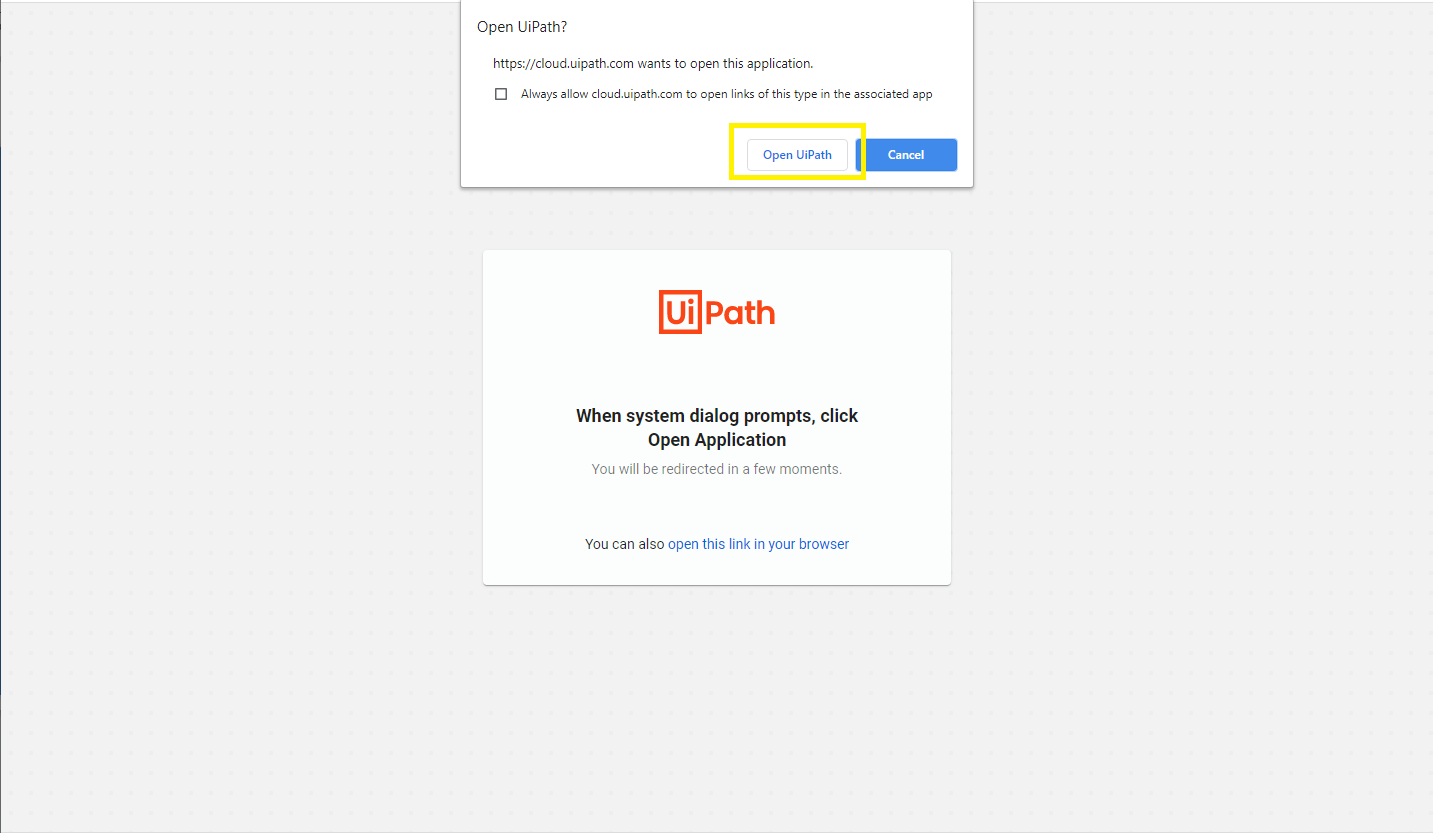
When the browser launches the webpage, click on the Open UiPath button on the system dialog prompt (consult the image below).
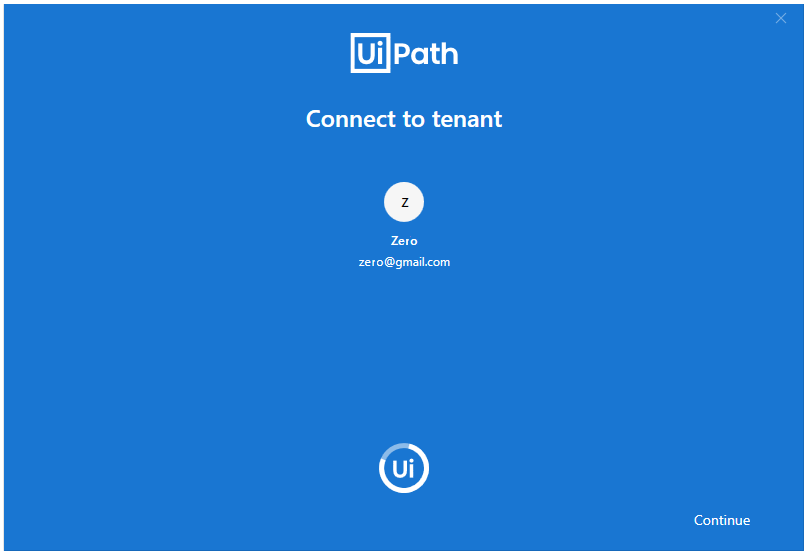
Wait for the UiPath Studio to connect to the tenant on your orchestrator cloud account (see the first image below); ensure that your PC is connected to the internet. If it successfully connects, you should see the screen depicted in the second image below.
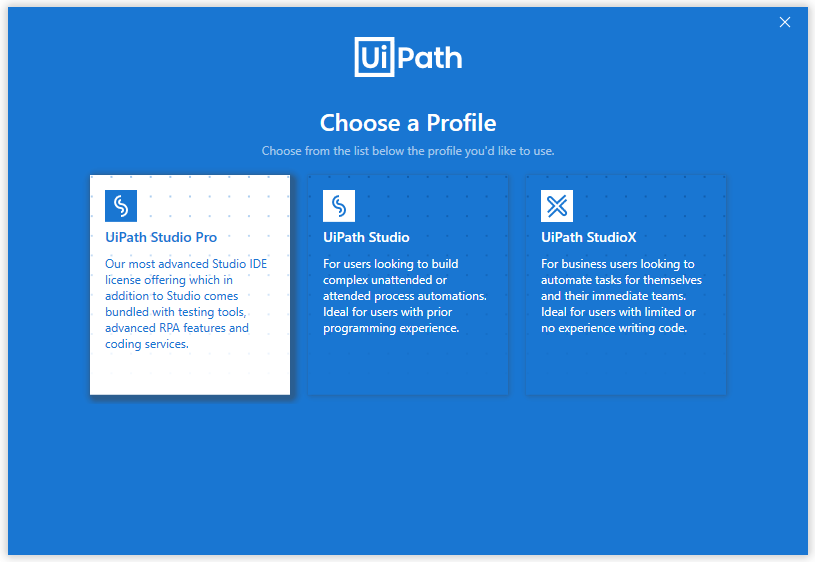
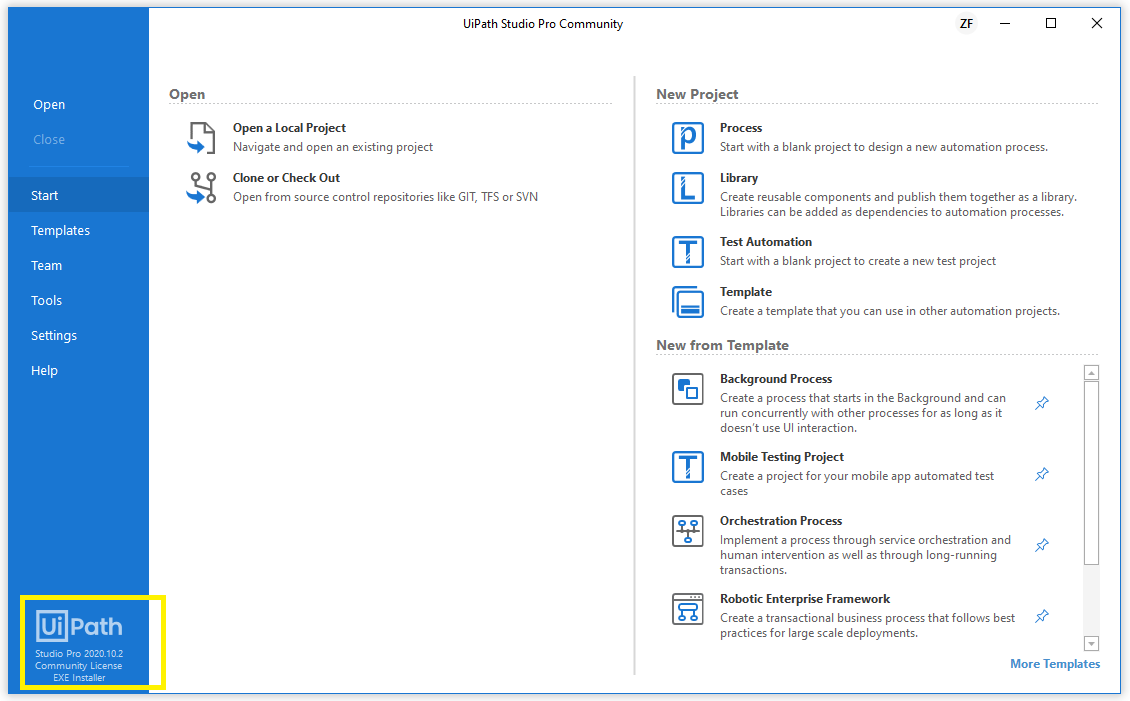
Click on the UiPath Studio Pro card (see the image above) to choose or select the StudioPro profile. When all is set and done, you should see a screen looking like the image below. Notice that the version of your Studio is shown on the bottom-left portion of the screen. Close the UiPath Studio application since we do not need it for any other step of this configuration process.
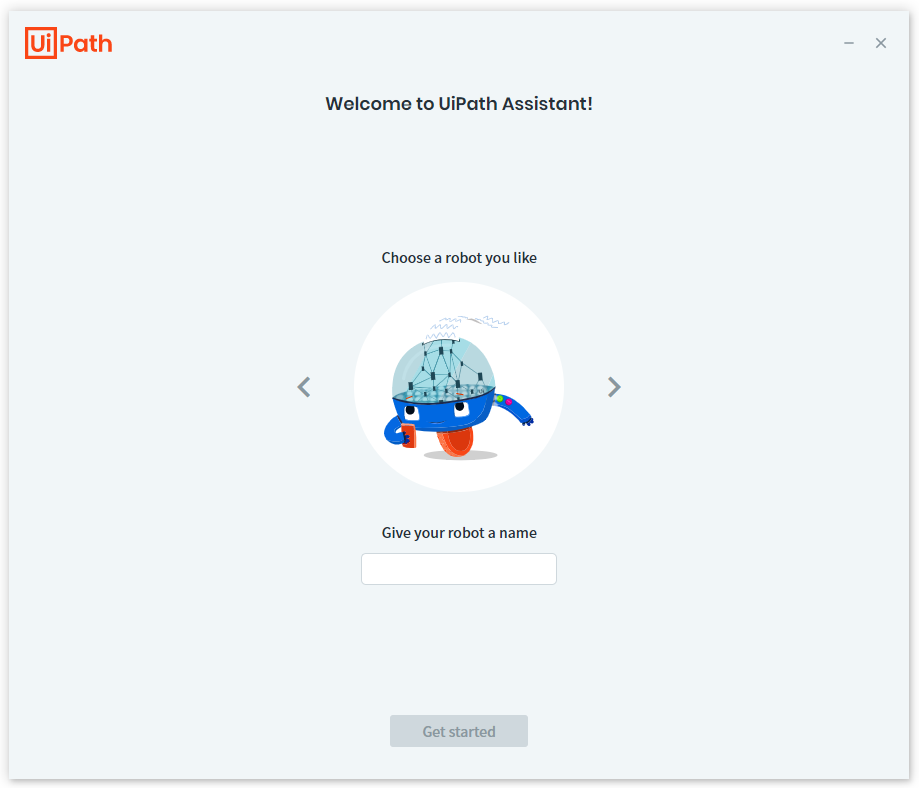
Click on the Windows Start button and search for UiPath Assistant; when you see the application, click on it to launch it. If the Assistant is running for the first time, you should see a window as depicted in the image below. Type in a robot name (e.g. ZeroBot) and then click on the blue Get Started button.
The UiPath Assistant app is fully initialized (see the image below). You can collapse the window to a small width using the Collapse button. Notice that the Connection Status Indicator is green; if you hover (or place) your mouse pointer on it, you will see a tip with a message like “Robot is connected to Orchestrator.” The orchestrator URL of your tenant is also shown, something of the form…
https://cloud.uipath.com/yourCompanyName/yourTenantName/orchestrator_/
Remember in Step 8, I mentioned that whenever the tenant name is changed, you will have to reconnect all your robot users? This is why. Notice that the name of the organization you filled when signing up for the account, as well as your tenant name forms a part of the connection string needed for each robot user to connect to the tenant on Orchestrator.

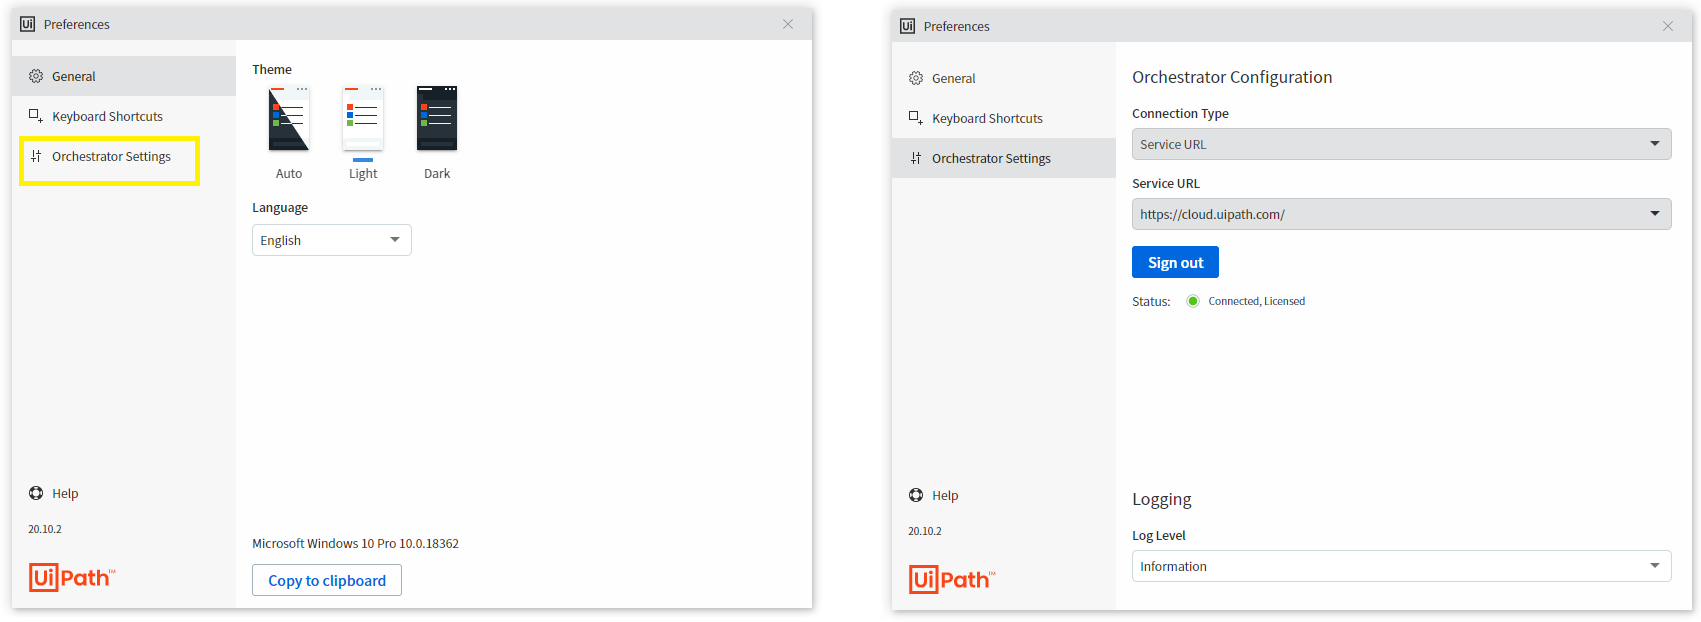
You can further personalize the UiPath Assistant app using the Preferences button. The image below shows the window that is opened when you click on the Preferences button on the one hand, and on the other hand, how to access the connection settings to Orchestrator.
Step 11
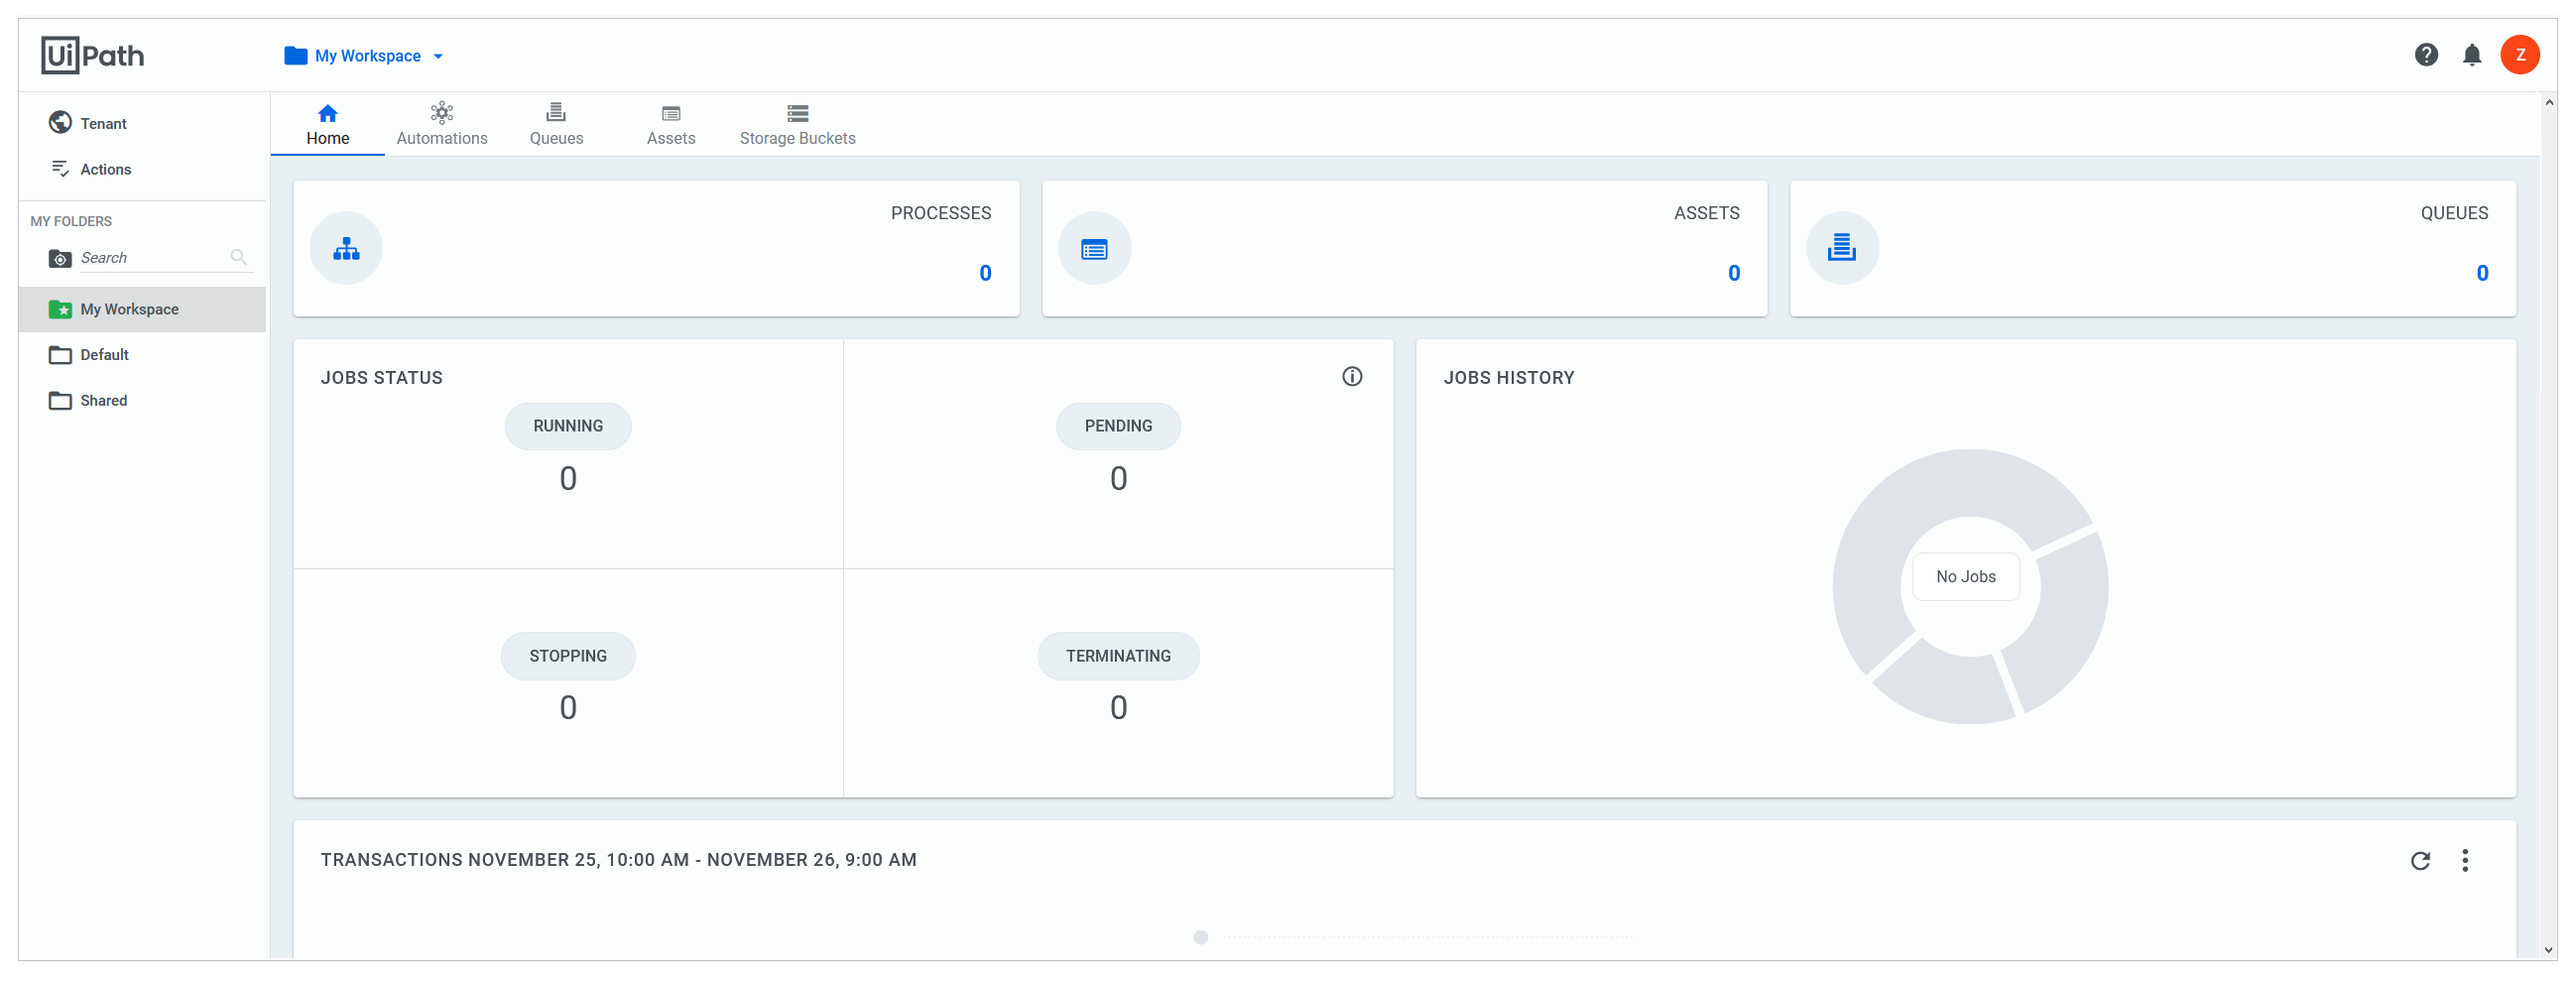
Now let us return to Orchestrator to continue the configuration process. Click on Home in the Menu area, and then click on the tenant (orchestrator service) name; refer to the image below.
When the tenant profile is opened, your screen should look like that depicted in the image below.
A tenant (orchestrator service) represents an orchestrator instance under your Orchestrator account, and the number of Robot User licenses your UiPath version (community or enterprise) gives you access to can be used across the tenants (orchestrator services) you have. For example, an organization can have a tenant (orchestrator service) to represent each of its branches or departments thereby allowing each branch or department respectively to have its own orchestrator instance which can be configured distinctly from the others.
If you have successfully followed the configuration steps up to this point, you can confidently say that your PC is connected to your Orchestrator (Automation Cloud) account. This is because the UiPath Studio application on your PC can communicate with UiPath Robot, a service running on your Windows OS; also, UiPath Robot can communicate with the tenant (Orchestrator Service) in your cloud account it is connected to.
In the course of this tutorial, you registered an account on UiPath’s Automation Cloud platform and this gave you access to Orchestrator. You also installed UiPath Studio on your Windows PC, connected it to your Tenant on Orchestrator, and chose the StudioPro profile. You also named your Robot User via the UiPath Assistant application.
You can now build automated processes as software robots. Congratulations!!!
Step 12
Your browser tab should look like the image below. Again, take note of the Menu area which is the left pane on the screen; we shall be accessing the menu items on this menu as we go along.
Step 13
Under the Management section of the menu area, click on MACHINES to open the Machines page. There is no data to show because no machine has been added to this service (orchestrator instance) yet. So you need to add your Windows PC to this instance, but to go about it we first need to know the name of your PC. How? Simply click on the Windows or Start button on your Taskbar (the taskbar is the bar at the bottom of your screen stretching from left to right, and it is usually of a black color; it houses your Windows or Start button on the left, and your date, system clock and other icons on the system tray on the right) and type “name” on your keyboard. You should see the “View your PC name” option on the list that shows, click on it.
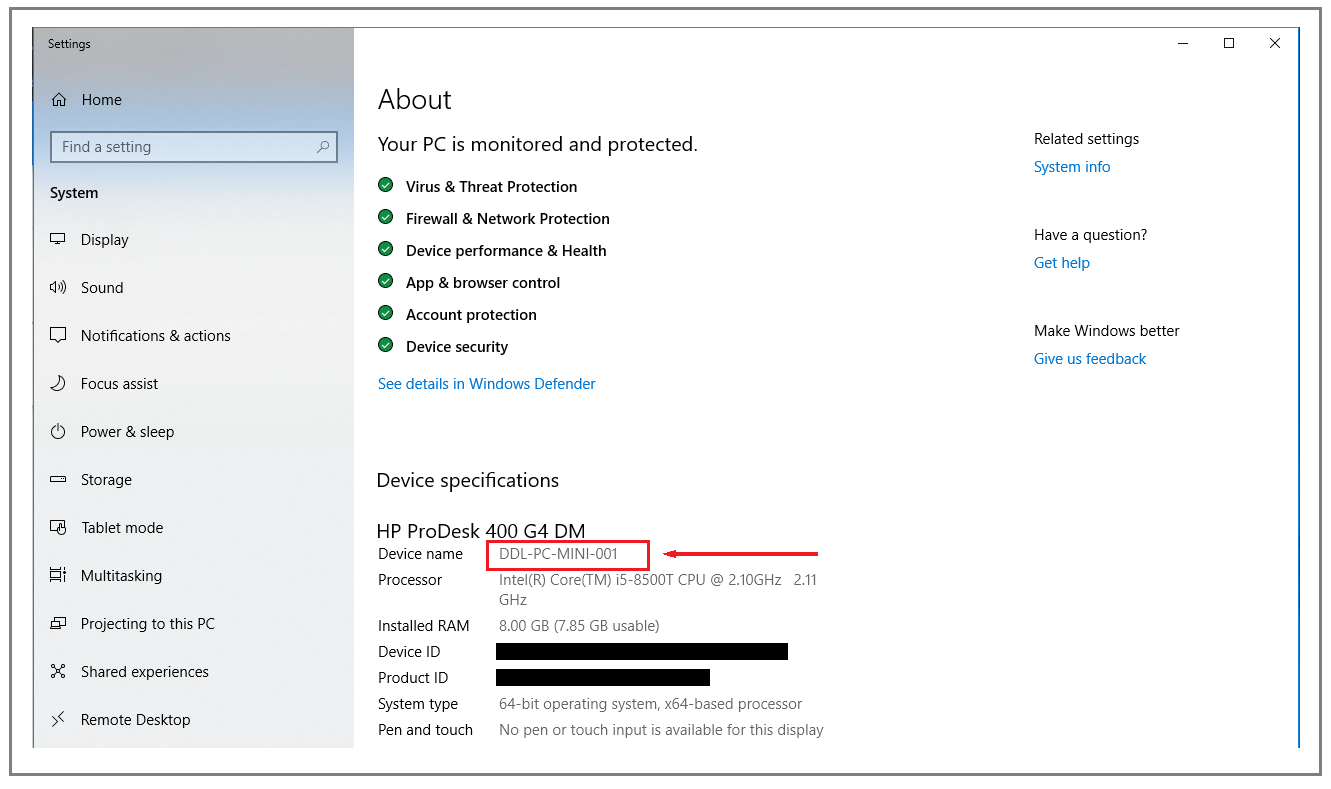
On the window that opens, look for “Device Name” you should find it under the ‘Device Specifications’ section; select it and copy it (use Ctrl+C) into the clipboard memory and close the window.
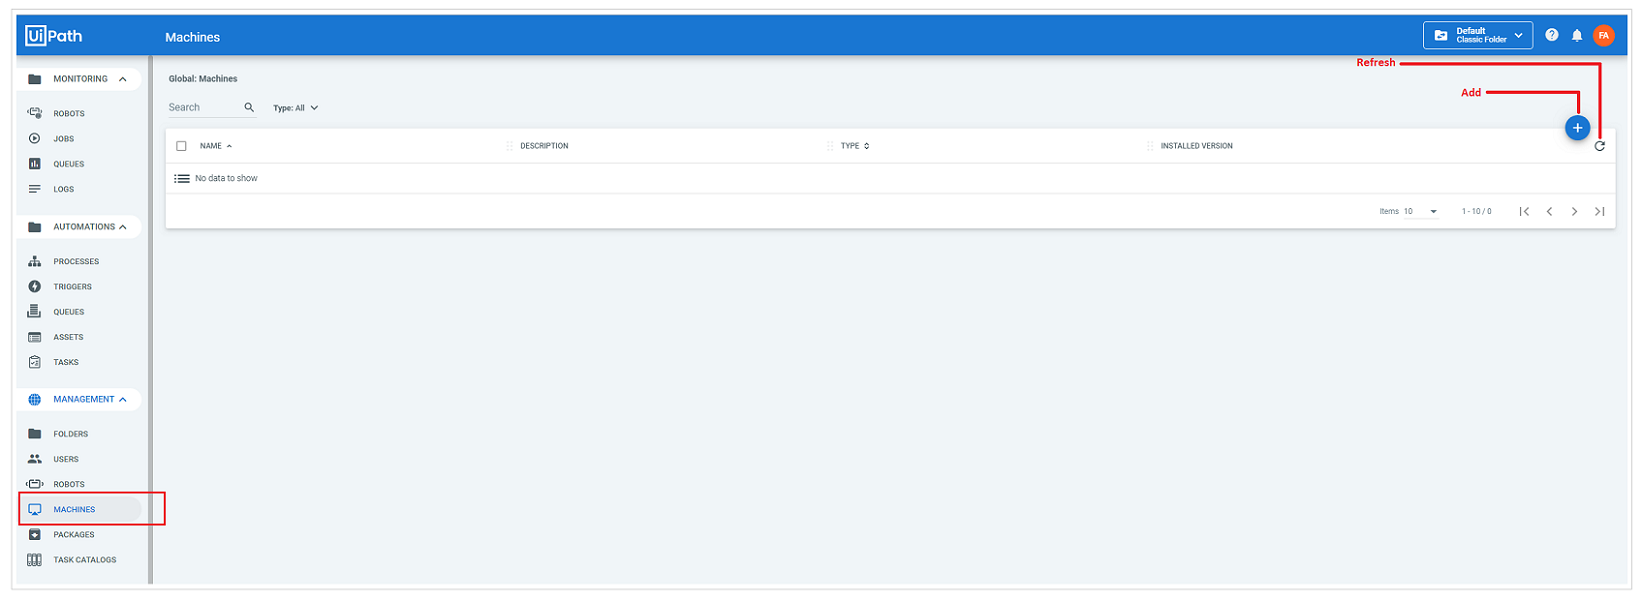
Now back to the Machines page, click on the Add button, it is a blue circle having a white plus sign in it; two more blue circular buttons appear. Move your mouse pointer on each of them so a tooltip that displays their name. The one we want is “Standard Machine” which should be the middle button; click on it.
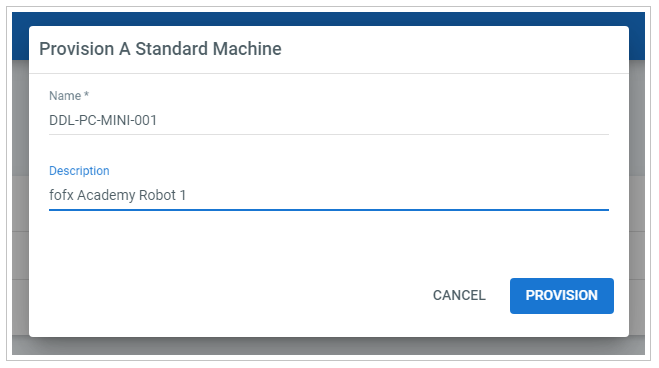
In the modal window that appears, paste your machine name you copied into memory and then click on the PROVISION button. If you have done everything right your machine name should now be visible on the machines list.
Step 14
Add a Robot.
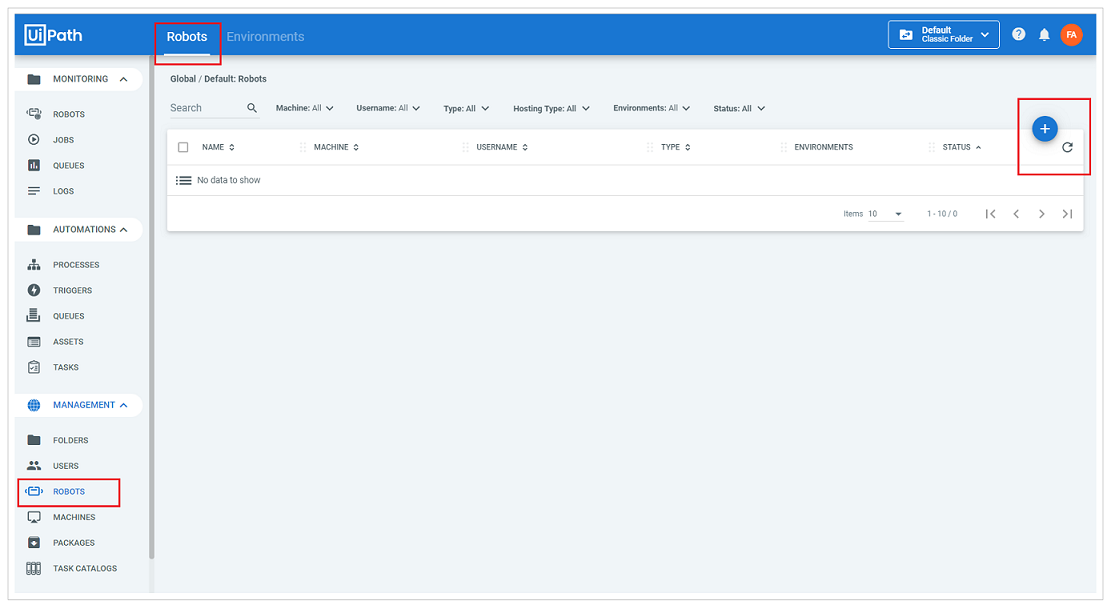
Still under the Management section of the menu area, click on ROBOTS to open the Robots page. There is also no data to show because no robot has been added to your service (i.e. orchestrator instance) yet. Notice that this page has two tabs (see the image below), one for Robots (which is currently the active tab) and one for Environments. Notice also, that the Robots page also has Add and Refresh buttons.
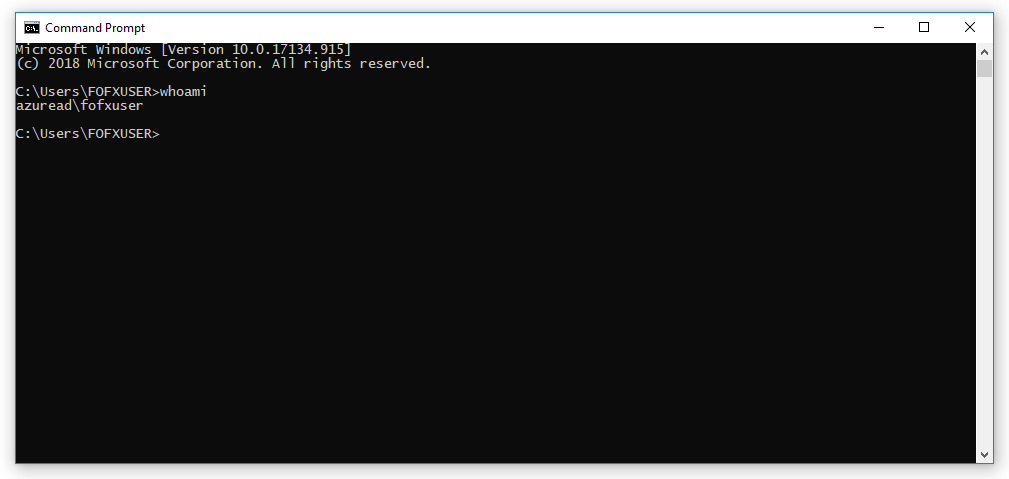
Before we can add a robot, we need to know the “Domain\Username” of our account on our Windows PC. So click on the Start/Windows button and type cmd on your keyboard; you should see “Command Prompt” on the list that appears, click on it. In the Command Prompt window, type this command whoami (standing for “who am i”) and press the Enter key. Select and copy the response returned by the command and then return to the Robots page on your browser.
Click on the Add button and two buttons appear, move your mouse pointer on each one to locate the Standard Robot button, then click on it to open a modal window which has two tabs: Description and Settings. Under the Description tab, click on the Machine dropdown and from the list, select the machine name you added in the previous step. Then…
- Enter in a name for your robot in the Name field.
- In the Type field, you can select between five options: ‘StudioX’, ‘Studio’, ‘Attended’, ‘Unattended’ or ‘NonProduction’. Recall from Step 7, we mentioned that the community license gives you access to 2 studio (development), 2 attended and 1 unattended robot. For the purpose of this tutorial, let us go with the ‘Studio’ option (Select ‘StudioX’ if your UiPath Studio is set to StudioX mode).
- Add a Description but this piece of information is optional.
- Paste what you copied from Command Prompt in the Domain\Username field.
- Lastly, enter in the password you can use to log into your Windows PC (you can leave it empty if you do not use a password to login to Windows); click on the ‘eye’ icon on the right of the Password field to make your password visible so you can be sure youtyped it correctly.
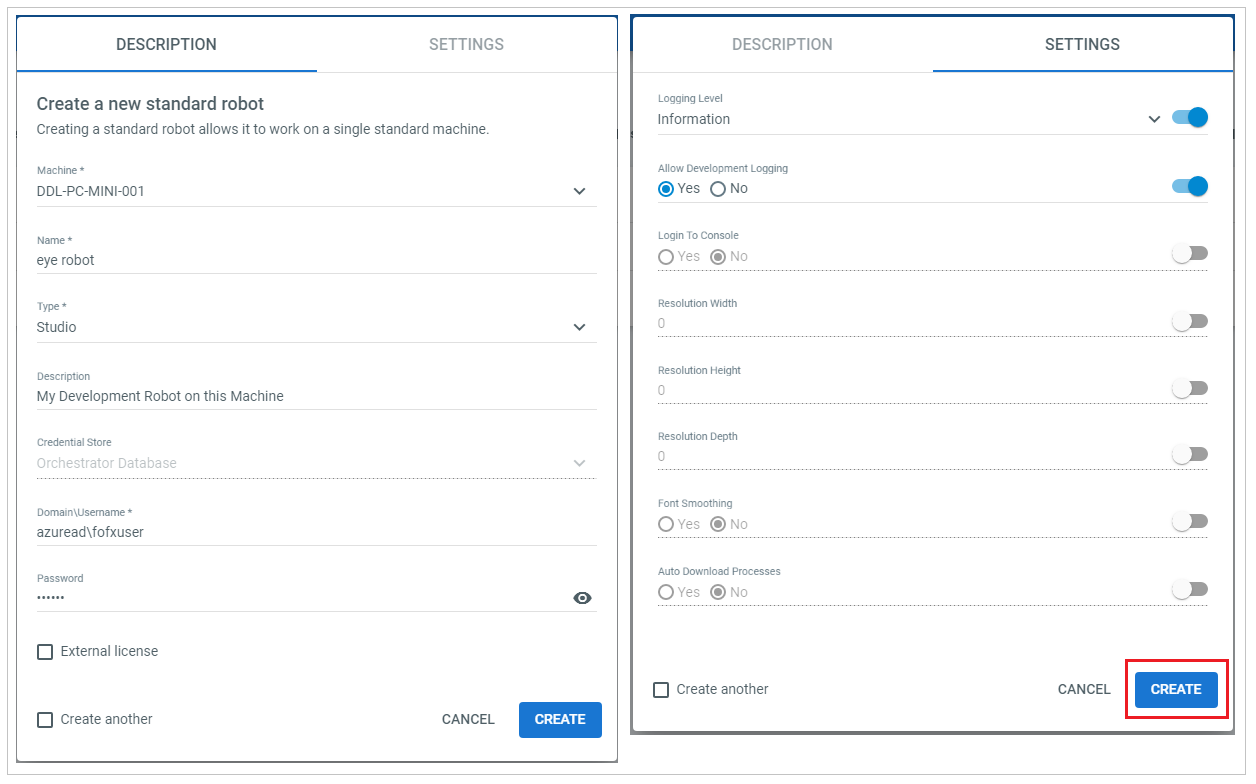
Still, in the modal window, click on the Settings tab and do the following…
- Set the Logging Level ON and select Verbose from the dropdown.
- If you so desire, you can set the Allow Development Logging slidder to ON too.
- Finally, click on the CREATE button.
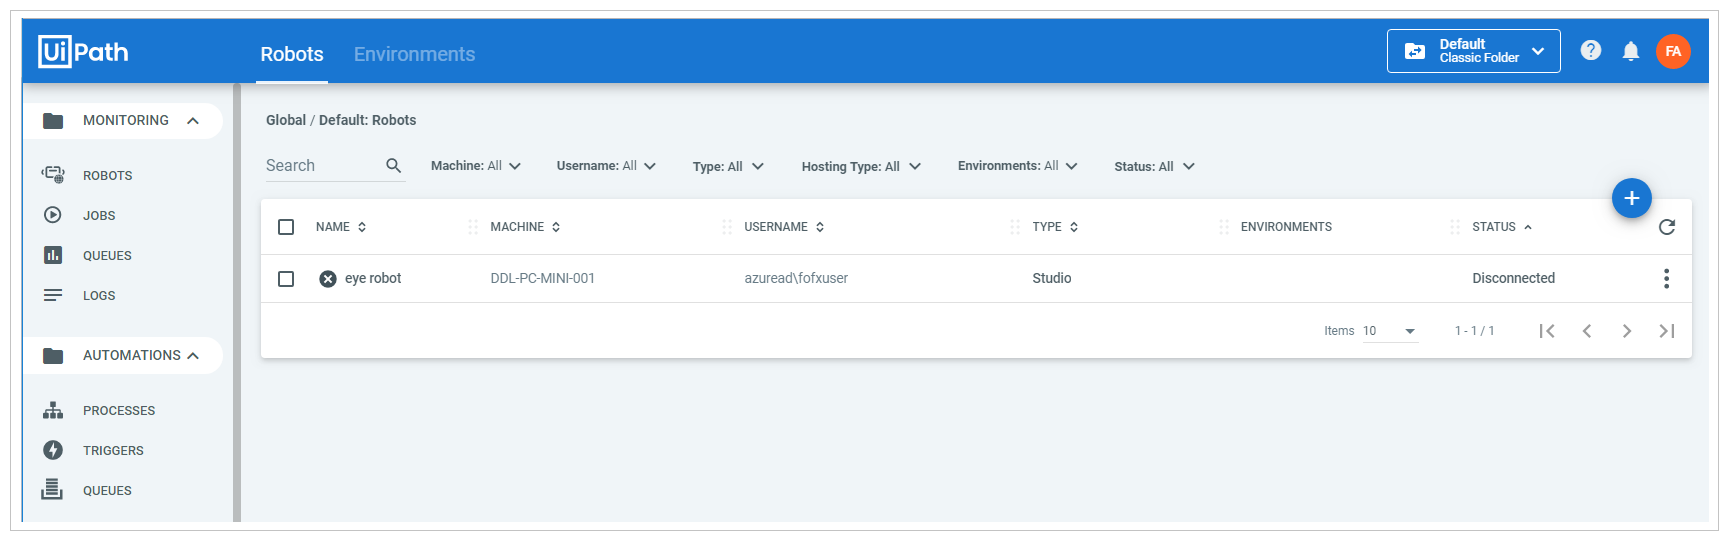
Observe that the newly created robot appears on the Robots list however, the Status column says our robot is disconnected, and a small black circle with an ‘x’ is displayed close to its name. Also, no value is given for it under the Environments columns. Time to add the robot to an environment of our choice.
Step 15
Add New Robot to Environment.
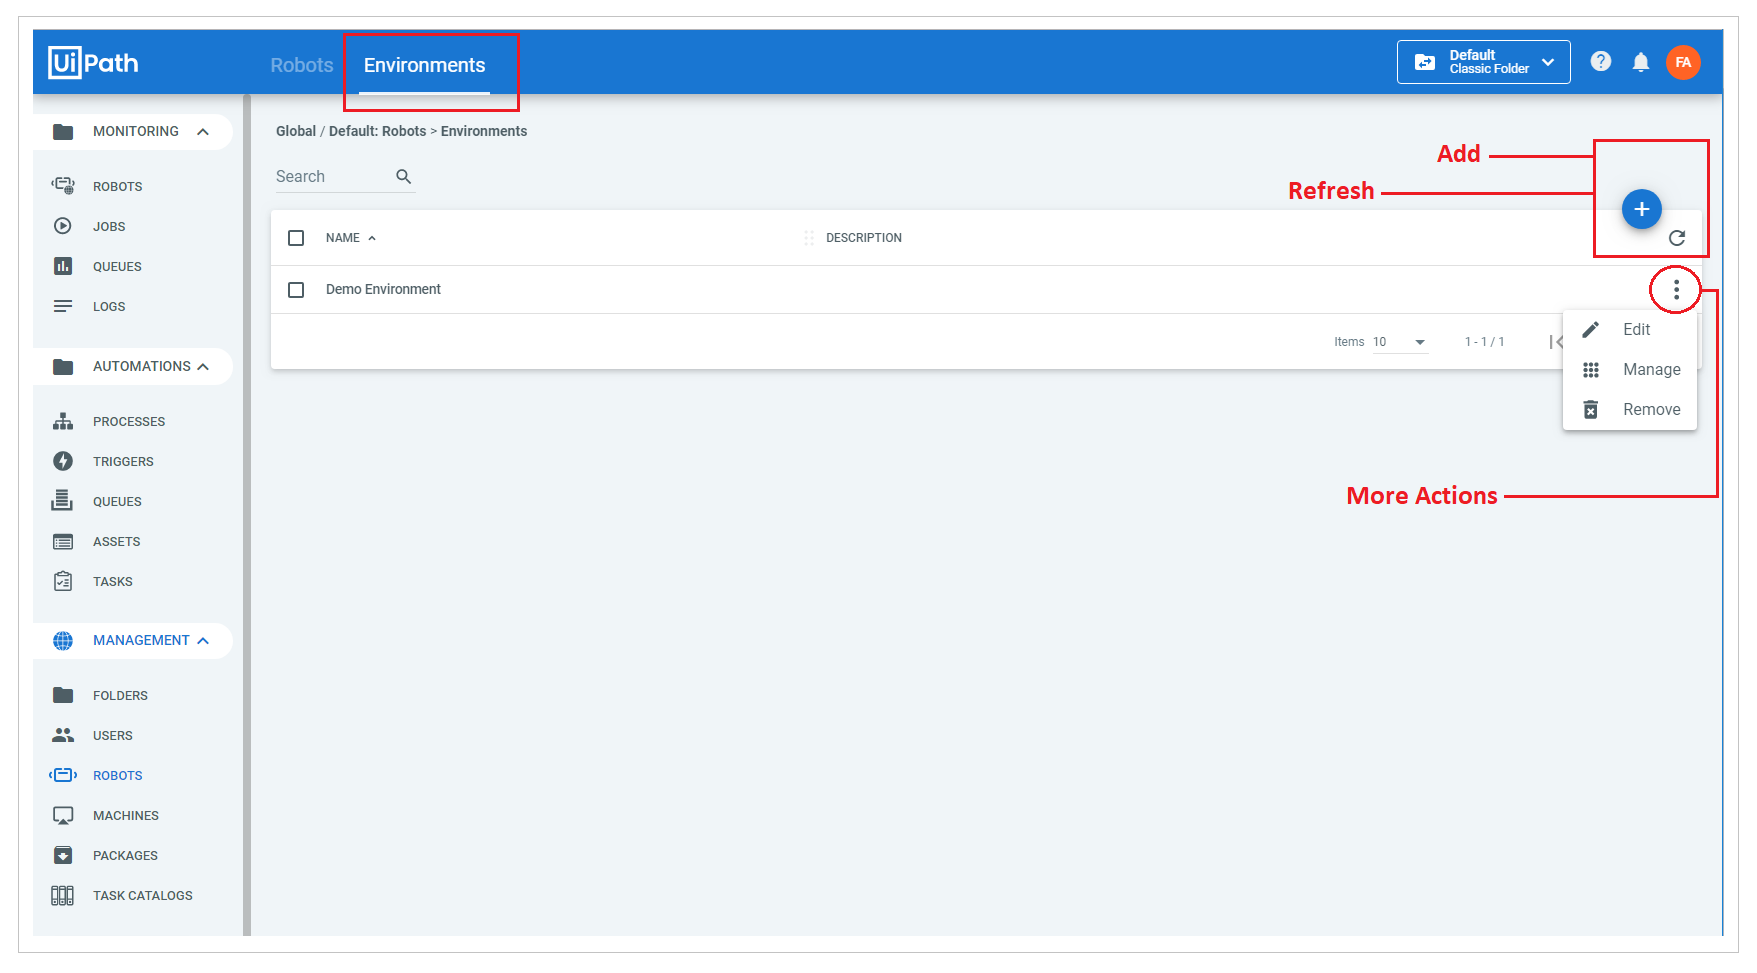
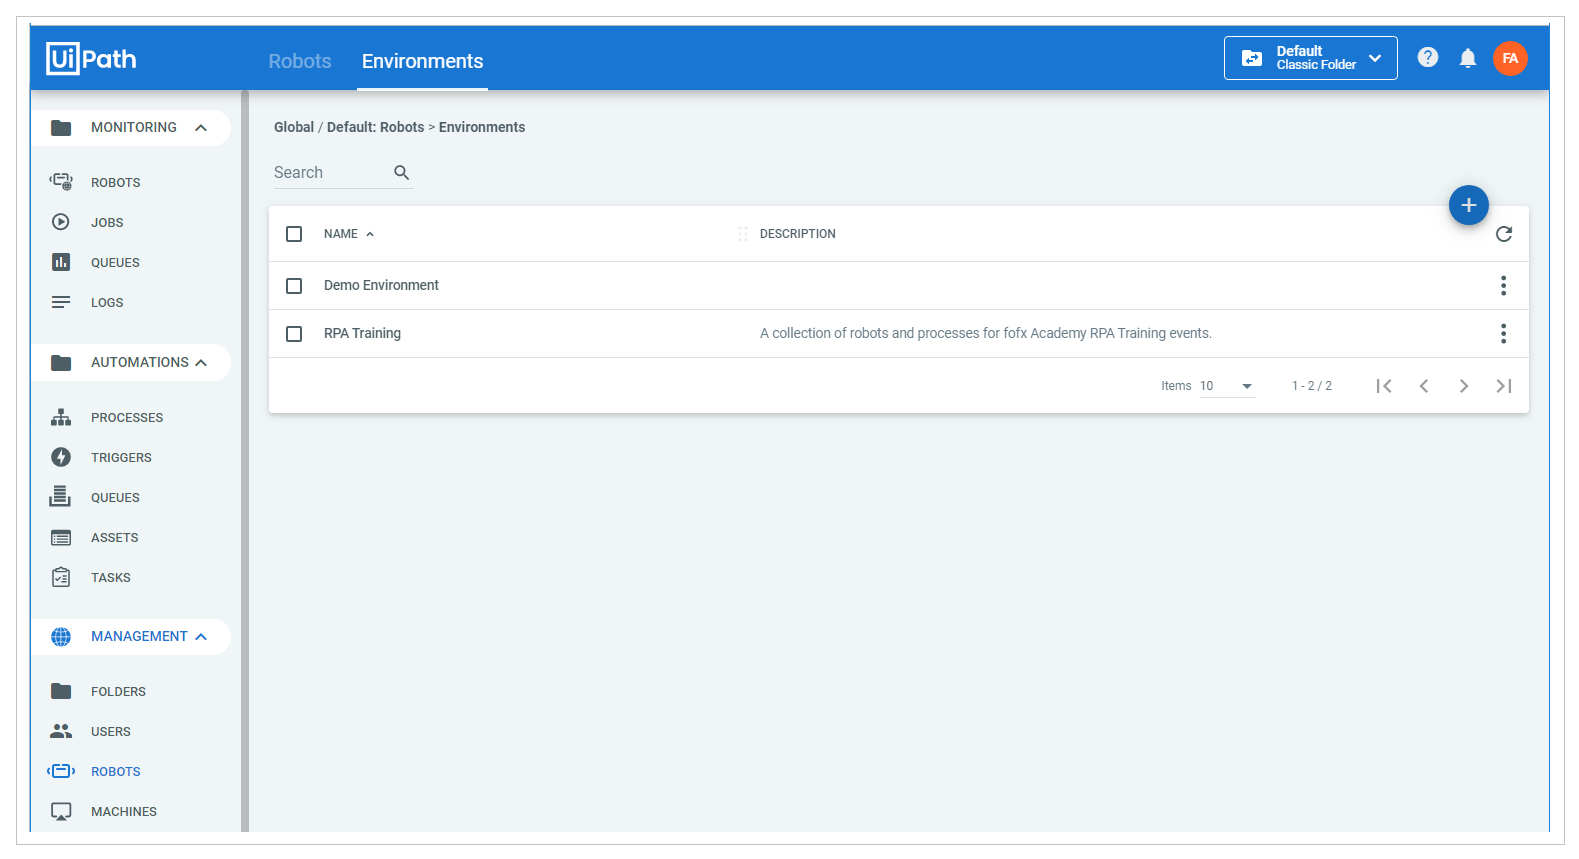
An environment can represent the departments or job/project categories in an organization. Click on the Environments tab to open the Environments page. Notice that there is one environment on the list, this “Demo Environment” comes with every new instance of Orchestrator along with a demo process. We shall let the demo environment be for now, but if at any other time you choose to remove it, simply click on the More Actions button, select “Remove” from the menu that appears; but first, you must detach every robot assigned to the environment, to do this, click on the More Actions button, take “Manage” from the menu that appears, then uncheck every robot assigned to the environment and click on the Update button.
To add a new environment, click on the blue and circular Add button to open the ‘Create Environment’ modal window. Type in a name for the environment, and if you so choose, add a description; then click on the CREATE button.
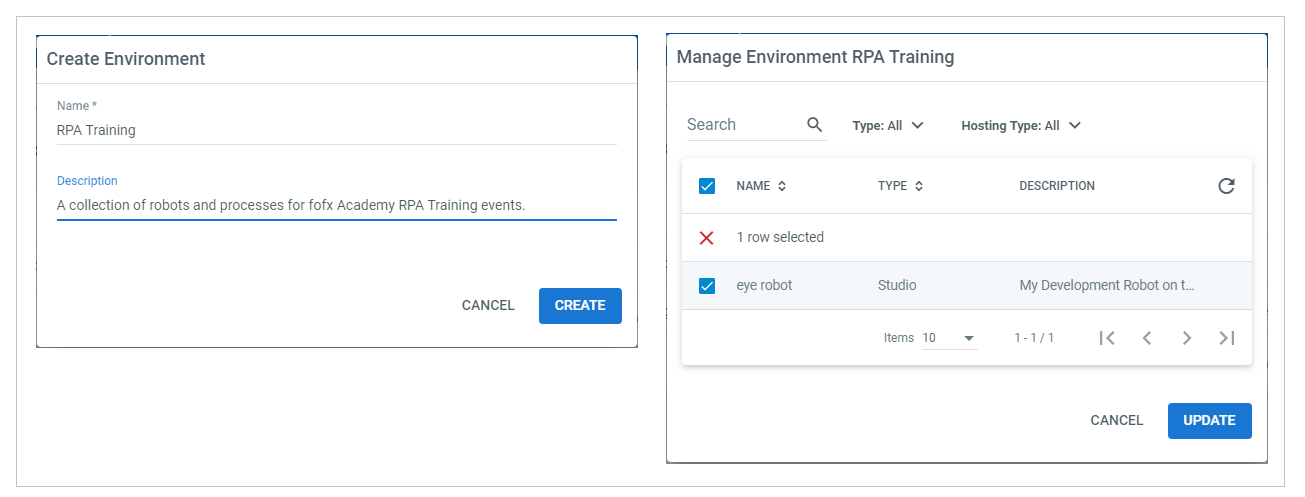
Another modal, “Manage Environment” modal window opens, it displays all the robots in your orchestrator instance so you can check the checkboxes of the robots you wish to select and when you are done, click on the UPDATE button. You should see the new environment on the list.
Step 16
Now that we have placed our robot in an environment (Note that a robot can belong to multiple environments), let us connect the robot to the Robot service on our PC. The first thing to do to copy the machine key of the machine we created earlier on.
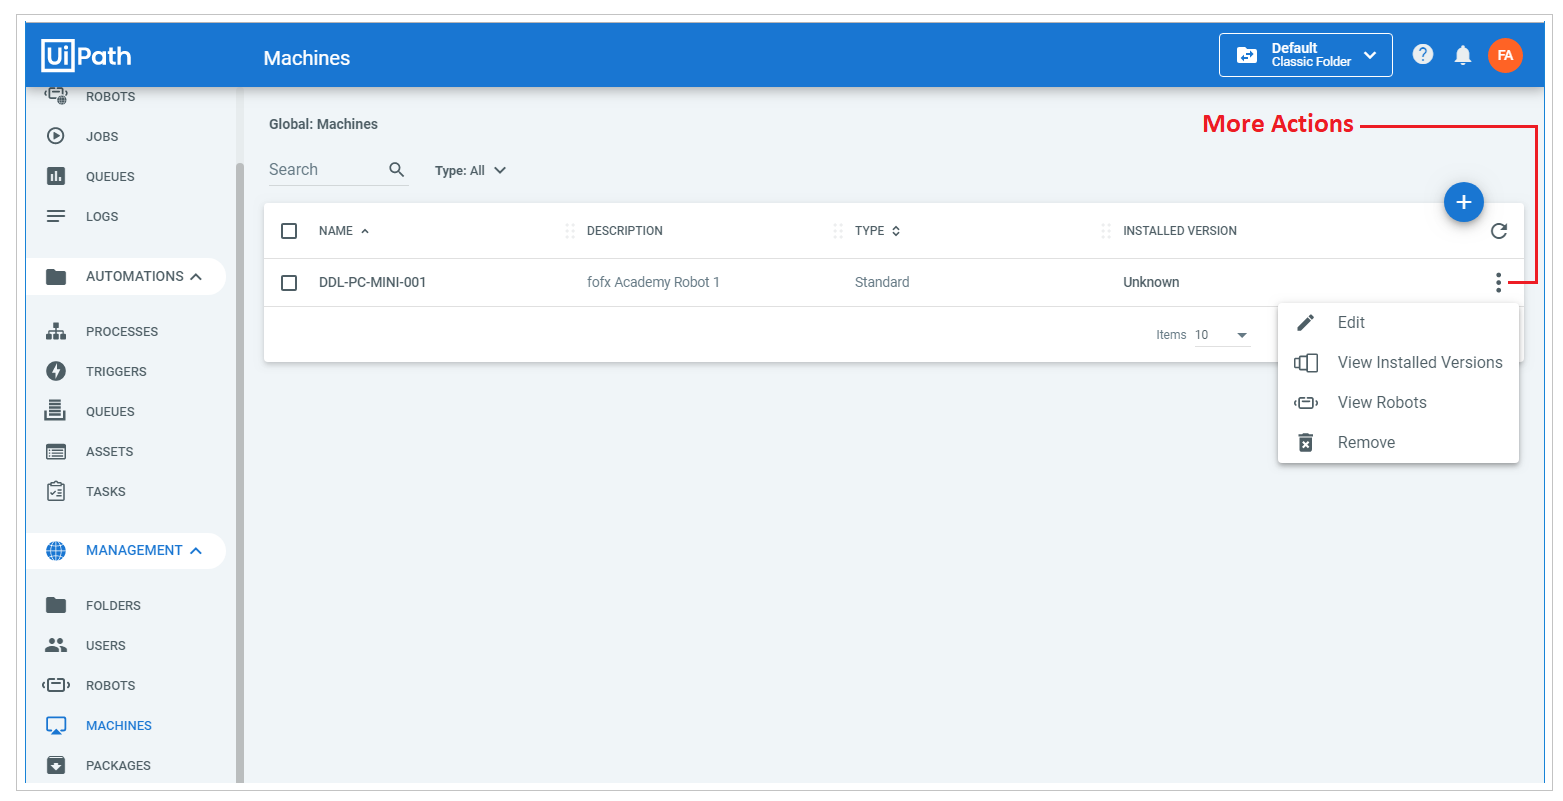
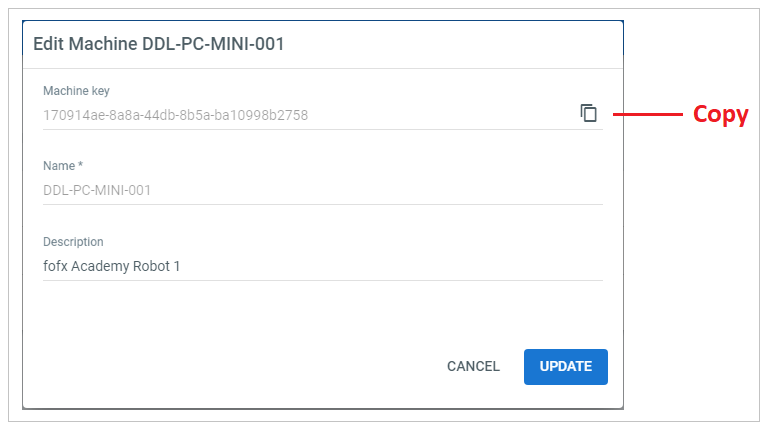
So go to the Machines page, click on the More Actions button (a vertical ellipsis showing on the far right of the machine name) and from the menu that appears, select View to open the ‘View Machine’ modal window and then click on the Copy button to copy the machine key to clipboard memory. Close the modal and then open a text editor like Notepad and paste the machine key there.
Next, click on the Start/Windows button and type the word uipath. You should see UiPath Robot on the list that appears; click on it to launch UiPath Robot application on the system tray of your PC. Go to your system tray and click the Show Hidden Icons (^) button; you should see an icon having a white square with blue-colored Ui letters on it… right-click on the icon and from the menu that appears, select the ‘Orchestrator Settings’ option.
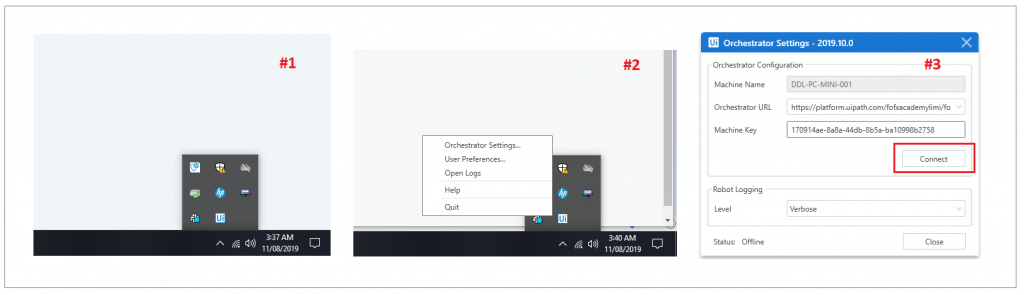
On the “Orchestrator Settings” dialog, if the Machine Name field is empty, type in the exact name of the machine you added on your Orchestrator instance. Also, type or paste the following as the case may be.
- Orchestrator URL field: get this from the address bar of the browser tab displaying your Service page; it is usually in the form… https://platform.uipath.com/{default-service-name}/{service-name}/ You can see that mine is https://platform.uipath.com/fofxacademylimi/fofxAcademy/
- Machine Key field: paste what you copied in the some few moments ago.
- Robot Logging Level: choose ‘Verbose’ from the dropdown.
- Finally, click on the Connect button
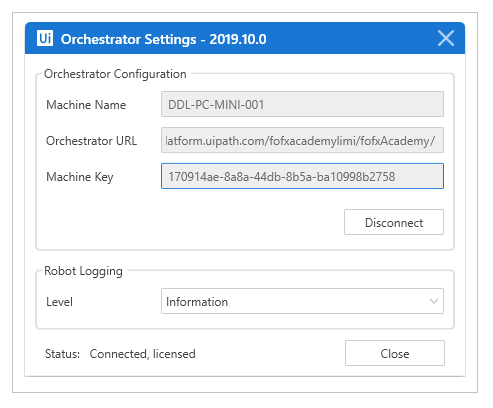
If you have followed these instructions carefully, the status of your device will change from Offline to Connected, Licensed.
Close the Orchestrator Settings window and return to the Orchestrator display on your browser. Open the Robots page by clicking on ROBOTS on the Menu area. Notice now that the Status of the robot reads Available while there is a small green circle close to the Username and the black circle that was close to the robot’s name some moments back, is now green too but with a white check inside it.

At Last...
In the course of this tutorial, you registered an account on UiPath’s platform and this gave you access to Orchestrator. You also installed UiPath Studio on your Windows PC. On your orchestrator instance, you registered your Windows machine name and then added a robot, assigning that robot to an environment before connecting orchestrator on your cloud account to your machine and the robot service in it. Henceforth, whenever you desire to log in to your orchestrator instance, simply go to https://platform.uipath.com on your browser.
Congratulations!!!
Next Steps...
The credentials (username and password) you used in signing up for an Automation Cloud account is a single-sign-on (SSO) credential. This means that you can use it to login to all other UiPath platforms without going through the hassle of registering on every platform.
- Login to UiPath Academy on your browser and take account and enroll for the RPA Starter course.
- Login to UiPath Community, an open network of passionate people and companies accelerating an automated world. Join our Lagos Nigeria chapter as well as other chapters around the world so you can participate in chapter, regional & global community events like meetups, hackathons, and webinars.
- Login to UiPath Forum a platform for RPA enthusiasts, developers, and professionals to ask questions, interact, and share knowledge.
Happy Automation!!!