


How to Setup Laragon as a Web Development Environment
According to the official documentation, Laragon is a portable, isolated, fast & powerful universal development environment for PHP, Node.js, Python, Java, Go, Ruby. It is fast, lightweight, easy-to-use and easy-to-extend.
Laragon is great for building and managing modern web applications. It is focused on performance – designed around stability, simplicity, flexibility, and freedom.
In this tutorial, therefore, we intend to see how one can install and configure Laragon as a development environment for web development.
Install Laragon
Go to Laragon’s official download site and download the latest version of the appropriate installer for your version of Windows. For the 64-bit Windows users, download either the Full or Lite edition. For the purpose of this tutorial, we shall be using the full edition.
After the download is complete, double-click on the Laragon installer to initiate the installation process. You may see a notice from User Account Control asking if you want to allow the app to make changes to your device; click the ‘Yes’ button to continue the installation process.
- On the “Select Setup Language” dialog, select your language of choice, in this case, English then click on the OK button.
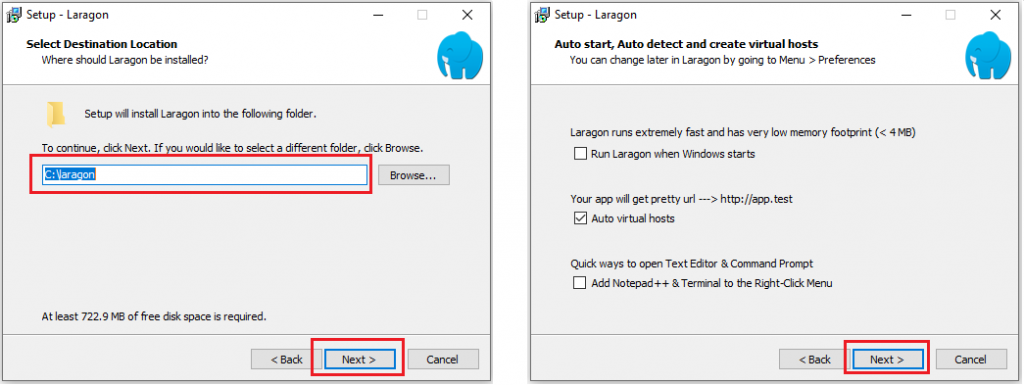
- On the “Select Destination Location” page, go with the default destination option which is
C:\laragonand then click on the Next button. On the “Setup Options” page, it is my personal preference to uncheck these two checkboxes: ‘Run Laragon when Windows starts‘ and ‘Add Notepad++ & Terminal to the Right-clik Menu‘. Now, click Next.
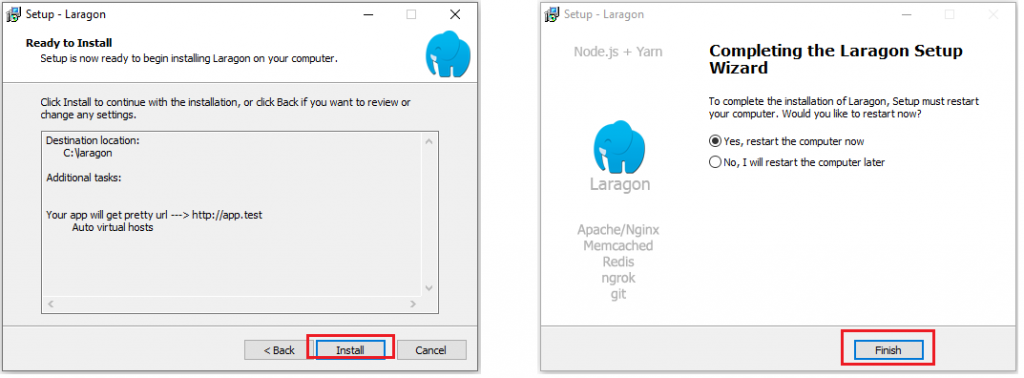
- On the “Ready to Install” page, click Install. When the installation is done, click on Finish so as to restart your machine.
Start Laragon
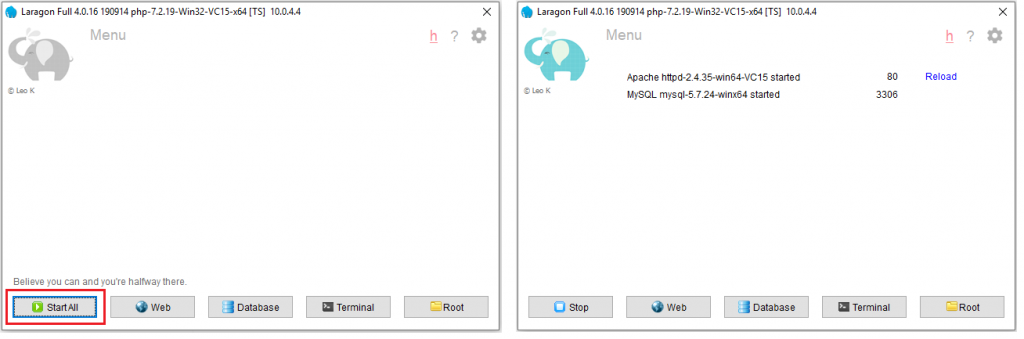
After your PC is done rebooting, launch the Laragon app from the desktop or from the Start menu. When Laragon opens, you should see an interface that looks like the image on the left below. Click on the Start All button to start Apache and MySQL.
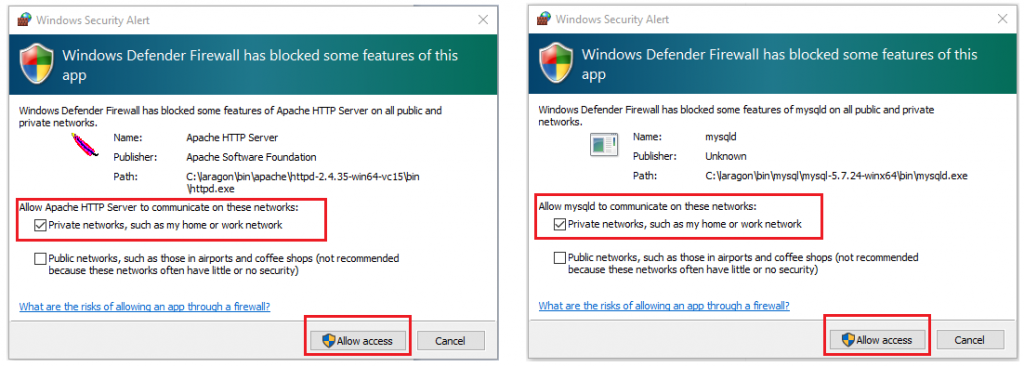
In the event you get a firewall notice like the ones depicted in the image set below, you can choose to deny or allow access. But since I trust my private network, I normally click on checkbox for private networks and then the ‘Allow access’ button for both Apache HTTP Server and mysqld so they can communicate on my private network.
Let us proceed with installing selected applications into the Laragon directory and configuring as part of our Largaon development environment.
Install Notepad++
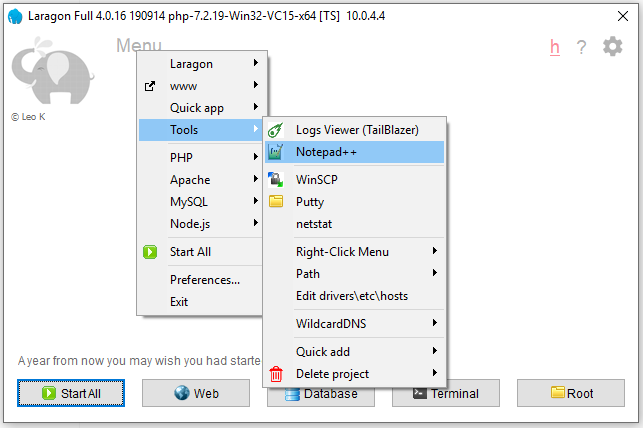
If you were to click on the Laragon menu and select Tools, you would observe that the Notepad++ is on the list of options; in fact, you can open the application from Laragon using Menu > Tools > Notepad++ ; you could also open a text (or .html or .css etc) file. However, you cannot see Notepad++ on your Start menu or as be listed as one of the installed programs under Control Panel > Programs .
The same thing goes for other apps like HeidiSQL, PuTTY, WinSCP, etc. I like to install these programs directly, and while I install, instead of the default destination directories as suggested by the installer, I select the C:\laragon\bin\<app-folder> directory. In this tutorial, we shall see how to install Notepad++ and a couple of other programs within Laragon. Let’s proceed.
- Before we get started, go to the
C:\laragon\bin\notepad++directory and delete the contents of the folder. We shall be using this approach for the other applications up for discussion in this tutorial with the exception of VS Code.
- So download the Notepad++ installer latest release HERE (Note: 32-bit Windows users should download the 32-bit x86 installer). After the download is complete, double-click on the installer file to start the installation process. Click the ‘Yes’ button on the User Account Control dialog; go with the default language, English.
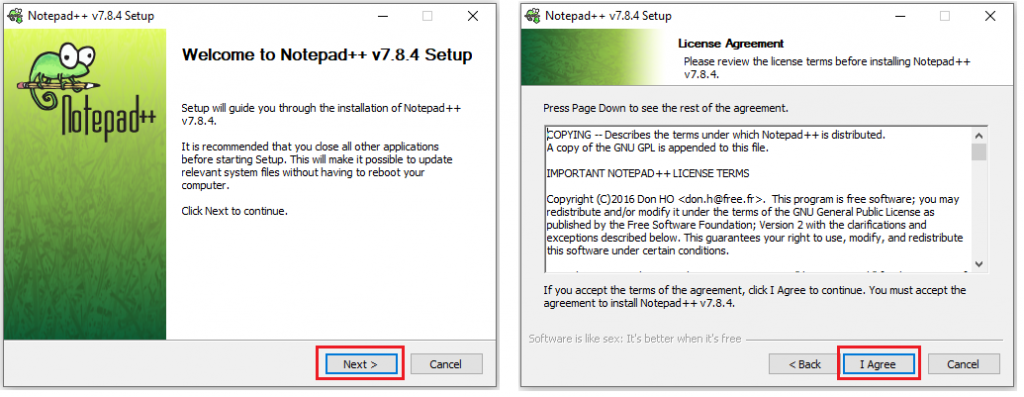
- Click the Next button on the “Setup – Welcome” page; then click the ‘I Agree‘ button on the “Licence Agreement” page.
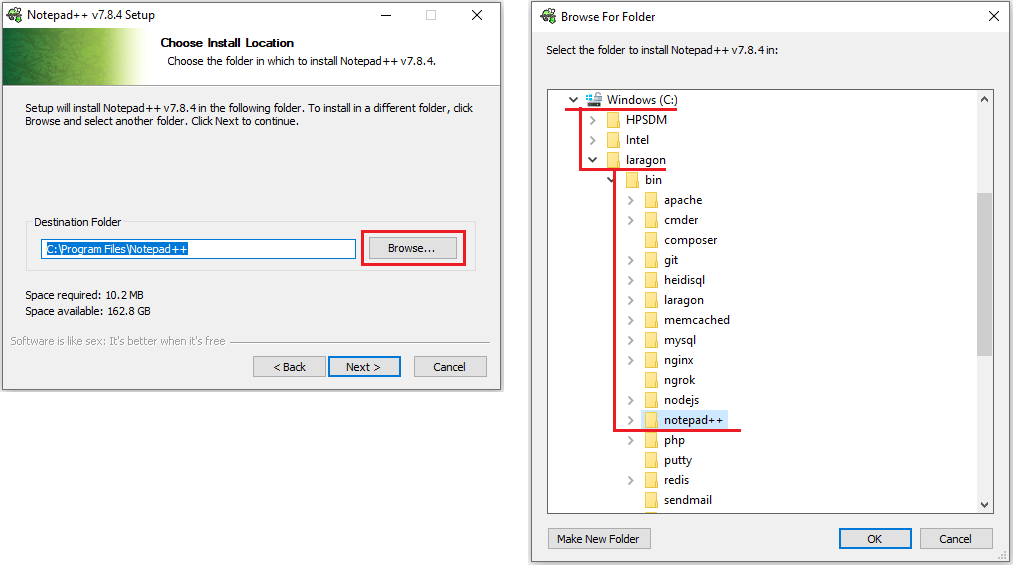
- On the “Choose Install Location” page, click on the ‘Browse…‘ button and select the
C:\laragon\bin\notepad++folder and click on OK. If you have done this well you should see the same directory address in the ‘Destination Folder‘ field (Alternatively, you can paste the directory path in the text-field). Click Next.
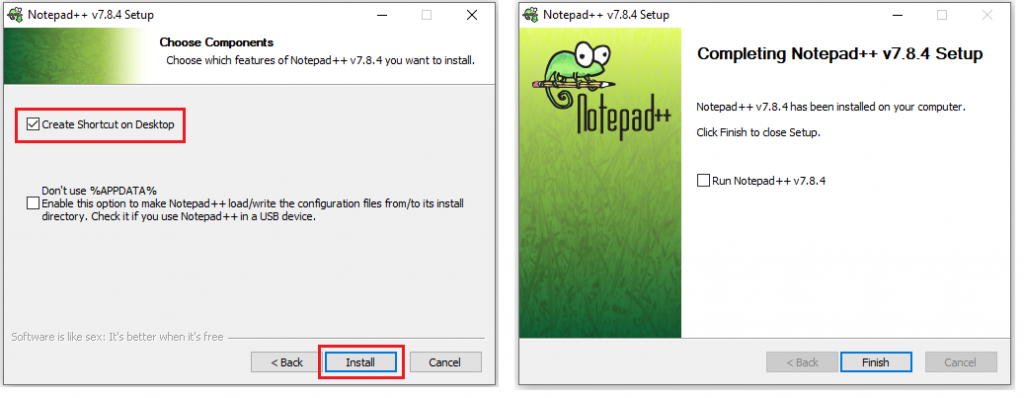
- On the first “Choose Components” page, click Next.

- On the second “Choose Components” page, check the ‘Create Shortcut on Desktop’ checkbox, and then click Install. On the “Completing Setup” page, uncheck the ‘Run Notepad++‘ checkbox and finally, click on the Finish button.
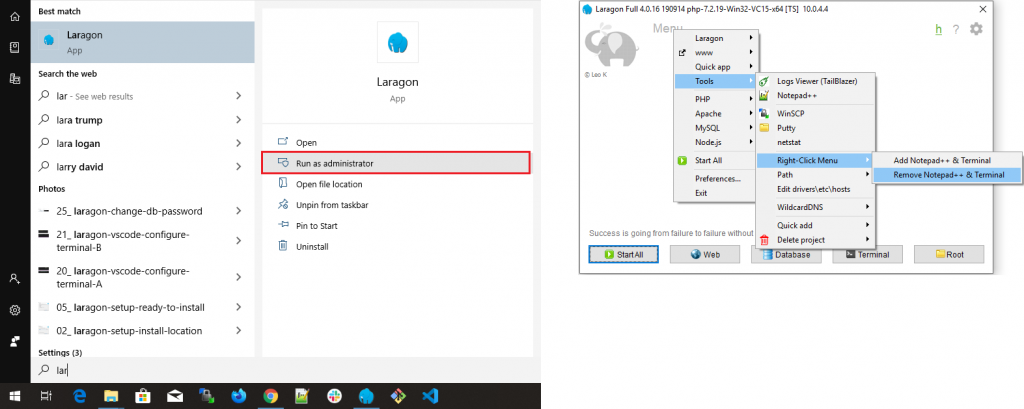
- If while installing Laragon, you unchecked the ‘Add Notepad++ & Terminal to the Right-Click Menu‘ then you can skip this step. But for those who did not, this is how you can disable this setting: exit Laragon if it is still running; press the Windows key on your keyboard and type ‘Laragon‘ then click on the ‘Run as Administrator‘ option that appears on the Start menu; from the Laragon menu, take
Menu > Tools > Right-Click Menu > Remove Notepad++ & Terminal. Simple! Right?
Just like before, you can open Notepad++ from the Laragon menu. But unlike before, if you hit the Windows key and type ‘Notepad‘ on your keyboard, you should see Notepad++ in the search list; you will also see Notepad++ listed under Control Panel > Programs .
Install Visual Studio Code
If you already have VS Code installed in your machine, you can skip this section. Howevr, if you want it as one of the apps installed within the Laragon directory then you have to first uninstall VS Code from your PC before continuing with the tutorial in this section.
Download the VS Code installer for your version of Windows from HERE. When the download is complete, double-click on the installer to commence the installation process.
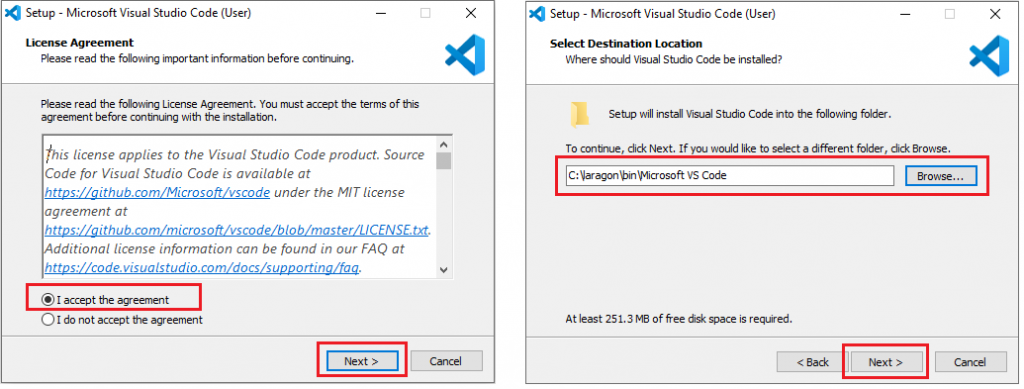
- On the “License Agreement” page, choose ‘I accept the agreement‘ and click Next. On the “Select Destination Location” page, click on the ‘Browse‘ button and navigate to the
laragon\bindirectory and click OK. If you have done it correctly you should seeC:\laragon\bin\Microsoft VS Codein the text-field; click Next.
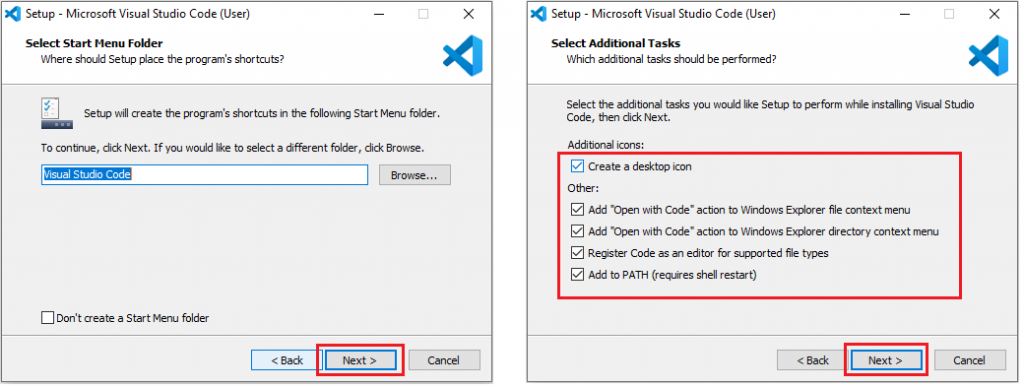
- On the “Select Start Menu Folder” page, click Next. On the “Select Additional Tasks” page, ensure you check all the checkboxes, then click Next.
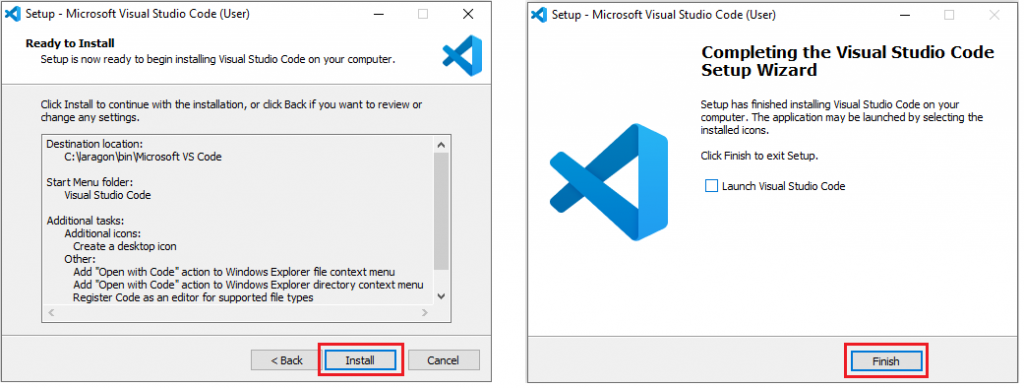
- On the “Ready to Install” page, click Next. When the installation is complete, click Finish.
Install PuTTY
Go to the putty folder within the Laragon Bin directory (i.e. C:\laragon\bin\putty ) and delete all the files therein. Next, download the Putty MSI Windows installer for your version of Windows from HERE. When the download is complete, double-click on the installer to commence the installation process. On the “Setup Welcome“ page, click Next.
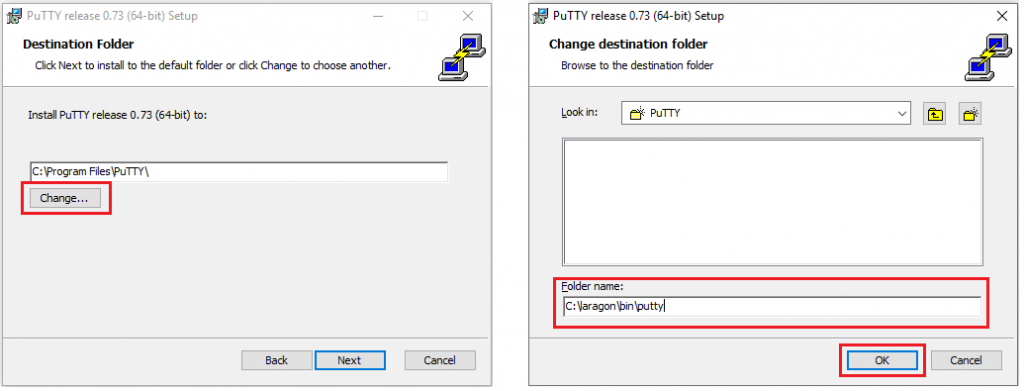
- On the “Select Destination” page, click on the ‘Change‘ button and in the “Choose Destination Folder” dialog that appears, paste
C:\laragon\bin\puttyin the ‘Folder name‘ text-field and click the OK button to return to the parent page; click Next.
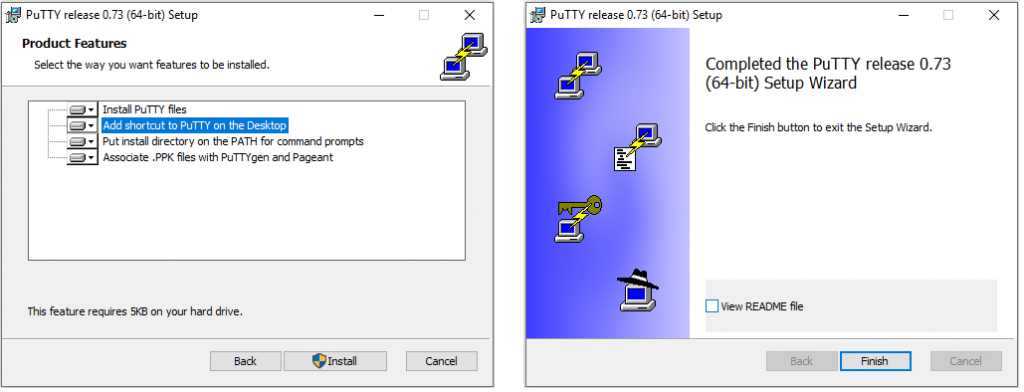
- In the “Product Features” page, right-click on ‘Add shortcut to PuTTY on the Desktop’ in order to select it as a feature to install; then click the ‘Install‘ button. Select ‘Yes‘ to the User Account Control dialog. When the installation is complete, uncheck the ‘View README file‘ checkbox and click Finish.
Install Git for Windows
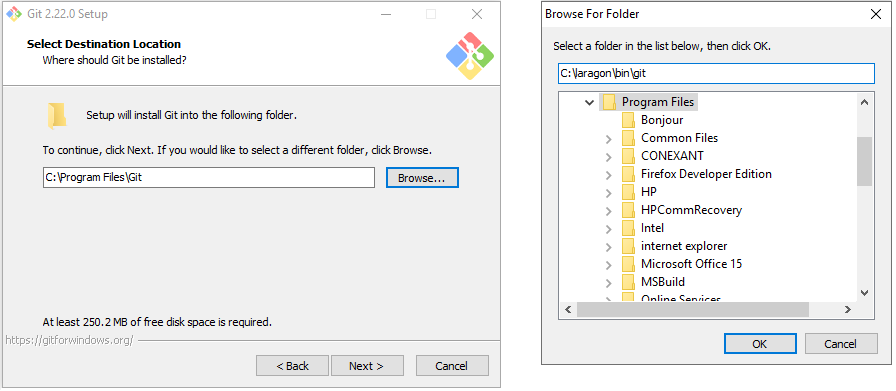
Go to the git folder within the Laragon Bin directory (i.e. C:\laragon\bin\git ) and delete all the files therein. Next, download the Git installer for your version of Windows from HERE.
Kindly follow our guide on how to setup Git on your PC. What you should NOTE however, is this: when you get to the “Select Destination Location” page, paste the directory path C:\laragon\bin\git in the location text-field before clicking the ‘Next‘ button. If you see the “Folder Exists” prompt, click ‘Yes‘ to continue the installation.
See the Git for Windows installation guide HERE.
Set Bash as VS Code Default Shell
If you prefer to use the shell options available by defaul to VS Code i.e. cmd or powershell, you can skip this section. However, if you are interested in using Git bash as your default shell within the integrated terminal of VS Code, then take the following steps.
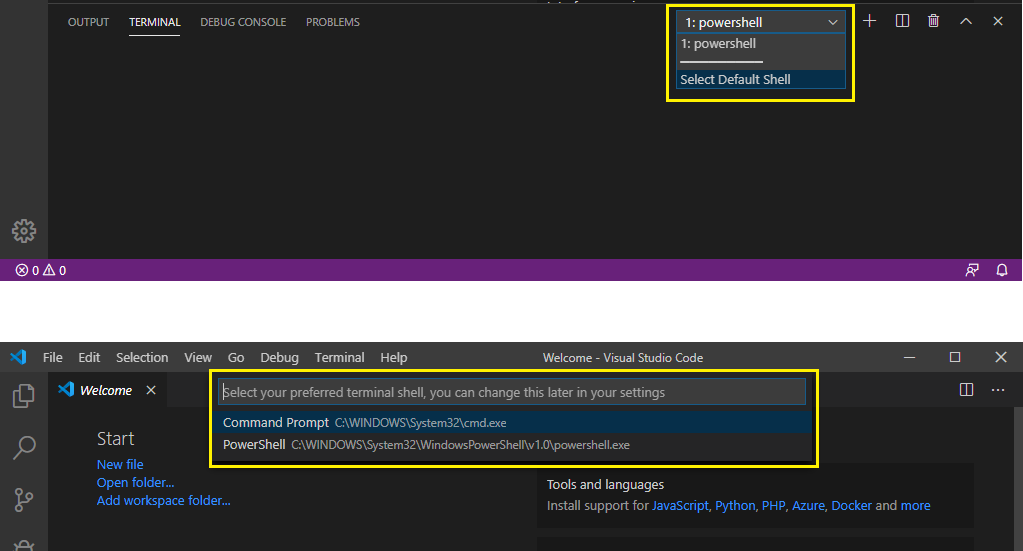
- Open the VS Code application. Use
Ctrl + `(i.e. Control and Back-tick, the Back-tick key is usually the key just below the Esc key) to open the integrated terminal. Click on the dropdown displaying the current shell, which is either cmd or powershell. If you click on ‘Select Default Shell’ you will see only the afore-mentioned two options. So how do we set Git Bash as our shell of choice?
- Open Command Palette from the View menu (or use
Ctrl + Shift + Pto open the Command Palette), then type Settings json to filter the command options, selectPreferences: Open Settings (JSON)to open the settings.json file. Within the braces (i.e. curly brackets), type this
"terminal.integrated.shell.windows": "C:\\laragon\\bin\\git\\bin\\bash.exe"
and then useCtrl + Sto save the changes before clicking on the close button to close the file. Exit VS Code and re-launch the application. You should see bash as the default terminal.

Set Root Password for MySQL
When you installed Laragon, Apache and MySQL were installed too. We suggest you create a root password to be used in accessing MySQL. This is how you go about it: ensure Laragon is running, if it is not, launch the application.
- Using the Laragon menu, select Menu > MySQL > Change root password to run the appropriate script.
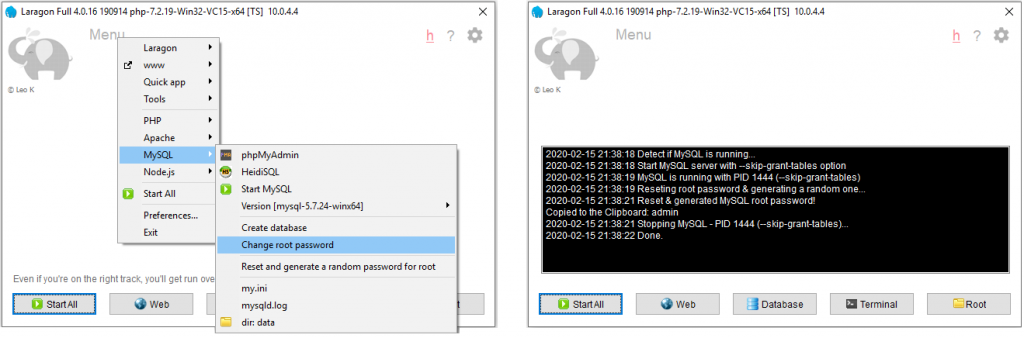
- When the script is done running successfully you should see a ‘Done; message. At htis point, you can exit Laragaon if you want to.
Install HeidiSQL
Go to the heidisql folder within the Laragon Bin directory (i.e. C:\laragon\bin\heidisql ) and delete all the files therein. Next, download the 32/64 bit combined HeidiSQL installer HERE. When the download is done, commence the installation. Click ‘Yes‘ on the User Account Control dialog.
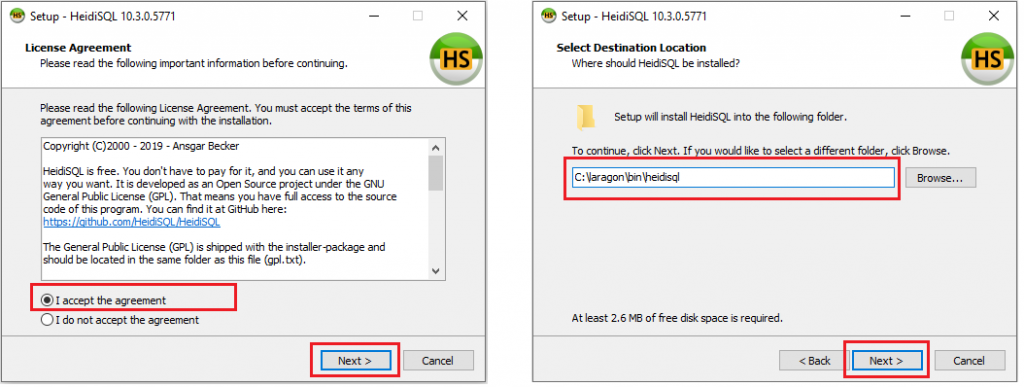
- On the “License Agreement” page, click the ‘I accept the agreement’ radio-button and then click Accept. On the “Select Destination Location” page, paste
C:\laragon\bin\heidisqlin the text-field. If the “Folder Exists” prompt pops up, click the ‘Yes‘ button.
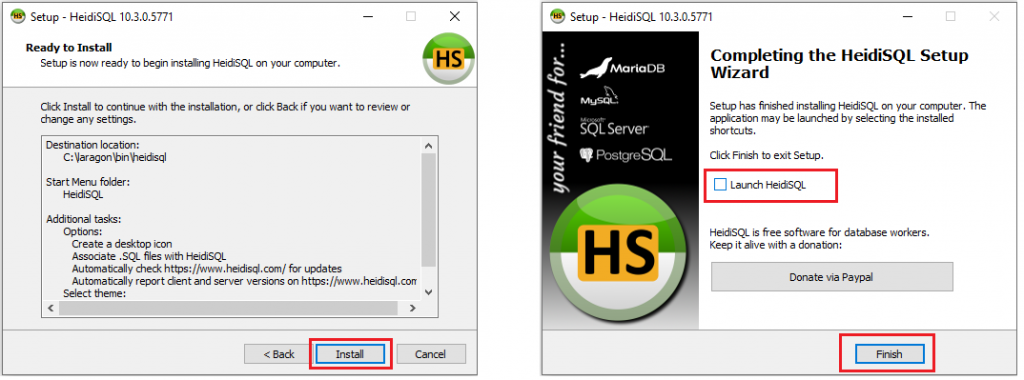
- On the “Select Start Menu Folder” page, click Next. On the “Select Additional Tasks” page, click Next.

- On the “Ready to Install” page, click Install. And when the installation is complete, uncheck the ‘Launch HeidiSQL‘ checkbox and click Finish.
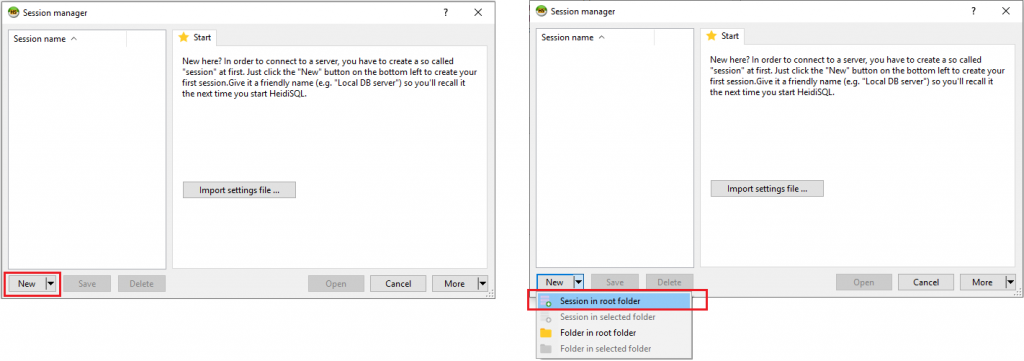
- Launch HeidiSQL from the Start menu or from Laragon’s menu i.e.
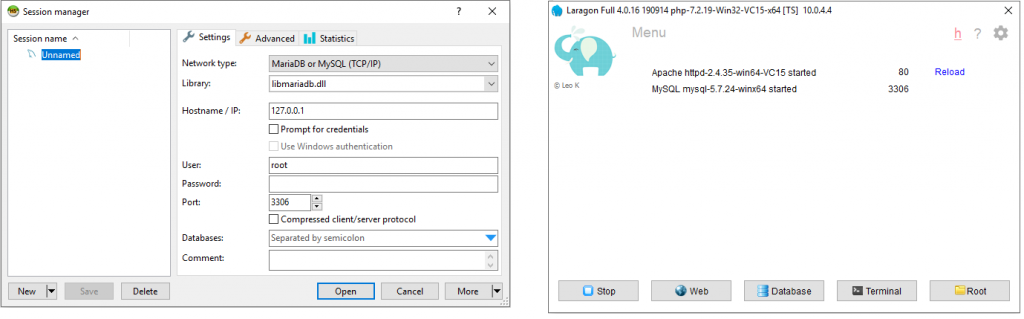
Menu > MySQL > HeidiSQL. Click on the ‘New‘ button and select the “Session in root folder” option.
- Press the Backspace key to remove
Unnamedand type a new name e.g.Laragonthen press the Enter key. Ensure that Largon is running and is started, if not, launch the Laragon application and click on the ‘Start All‘ button on the Laragon interface.
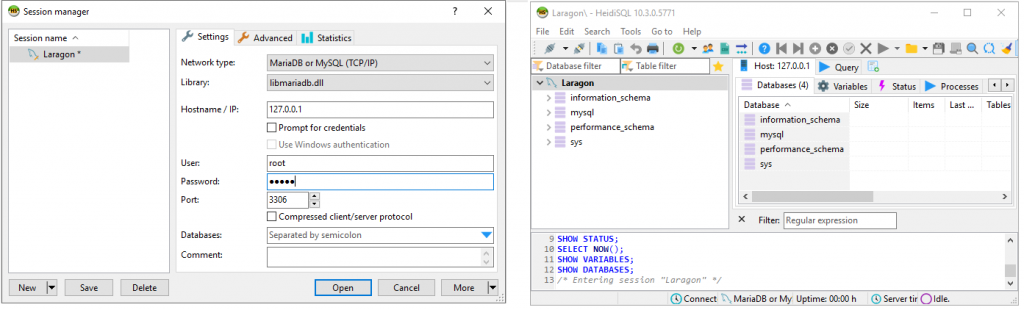
- Type in your database password and click Open. If you have done every step as you should, HeidiSQL should open as depicted in the image below on the right.
Install WinSCP
Go to the winscp folder within the Laragon Bin directory (i.e. C:\laragon\bin\winscp ) and delete all the files therein. Next, download the latest release of the WinSCP installer HERE. When the download is done, commemce the installation. Click ‘Yes‘ on the User Account Control dialog.
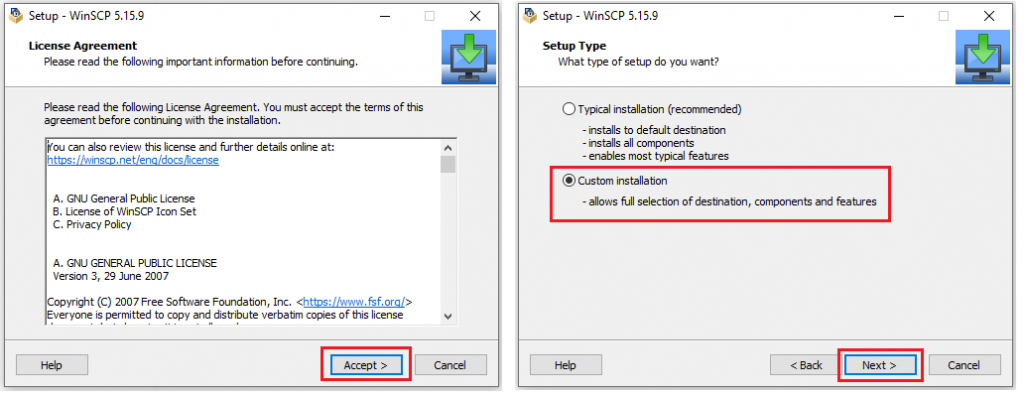
- On the “License Agreement” page, click Accept. On the “Setup Type” page, choose the ‘Custom installation‘ option and click Next.
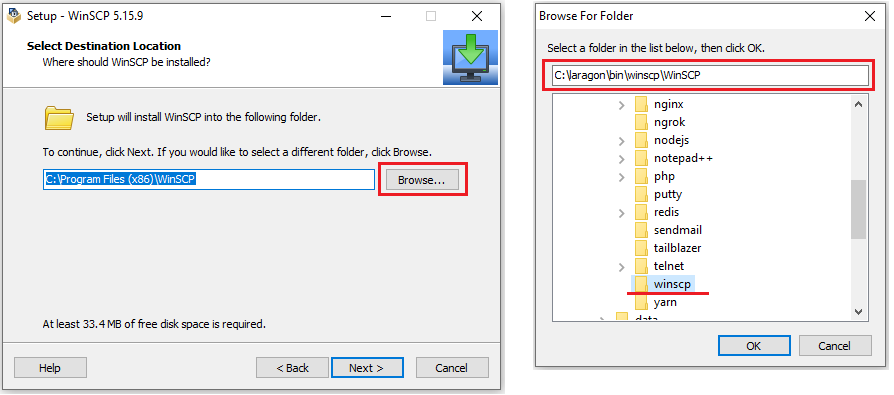
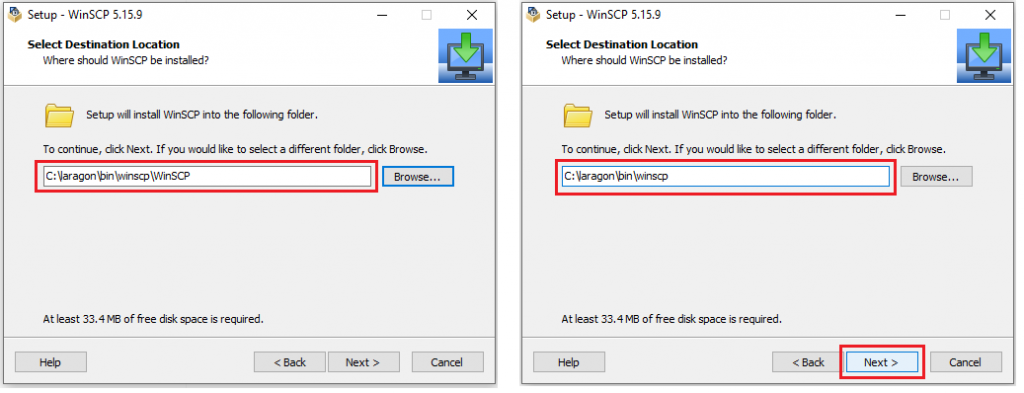
- On the “Select Destination Location” page, click on the ‘Browse‘ button and navigate to the winscp folder in the laragon\bin directory and click OK. You should see
C:\laragon\bin\winscp\WinSCPin the text-field, however, you have to edit it toC:\laragon\bin\winscpthen click Next. If you see a prompt saying the folder already exists, click on the ‘Yes‘ button to continue the installation.
- On the “Select Components” page, click Next. On the “Select Additional Tasks” page, check the ‘Add installation directory to search path‘ checkbox; you can also choose whether to install the application for current user or for all users; click Next.
- On the “Initial User Settings” page, go with the default selection i.e. ‘Commander‘ then click Next. On the “Ready to Install” page, click Install. And when the installation is done, uncheck both checkboxes for ‘Launch WinSCP‘ and ‘Open Getting Started page‘, click Finish.
Conclusion...
We shall stop here for now. This tutorial can be updated as often as possible to include further configuration of Laragon, and also that other applications that have not treated can be discussed as well. Thank you for your time. Au revoir!!!